Batch editing in Photoshop can save you a great deal of time when you need to make changes to multiple files. One popular case is when you need to resize a batch of images for use either online or on print. In this article, we will explain how to use Photoshop’s Image Processor tool to resize a batch of images in a few simple steps.

Preparing Your Files

Before you begin the batch editing process, have all of the files you wish to edit located in the same folder on your computer. This makes the process much smoother and ensures that no files are missed. We also recommend that you create a backup of any files you intend to edit, just in case.
Starting the Image Processor
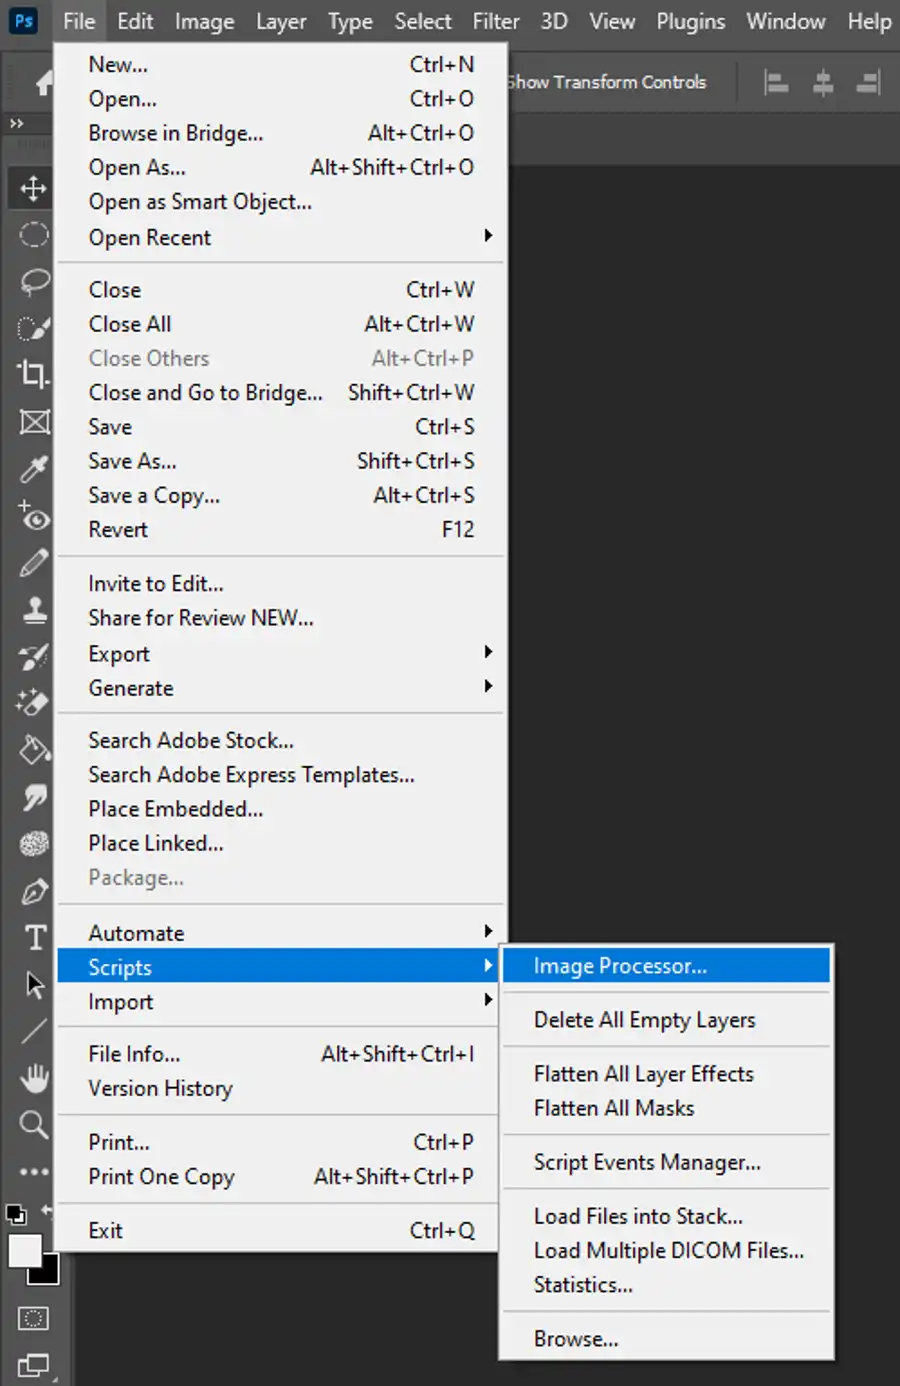
Once your files are consolidated in a folder, launch Photoshop and click on File, then Scripts. From the drop-down menu, select Image Processor. A window will then pop up, allowing you to begin the batch resizing process.
Selecting the Folder
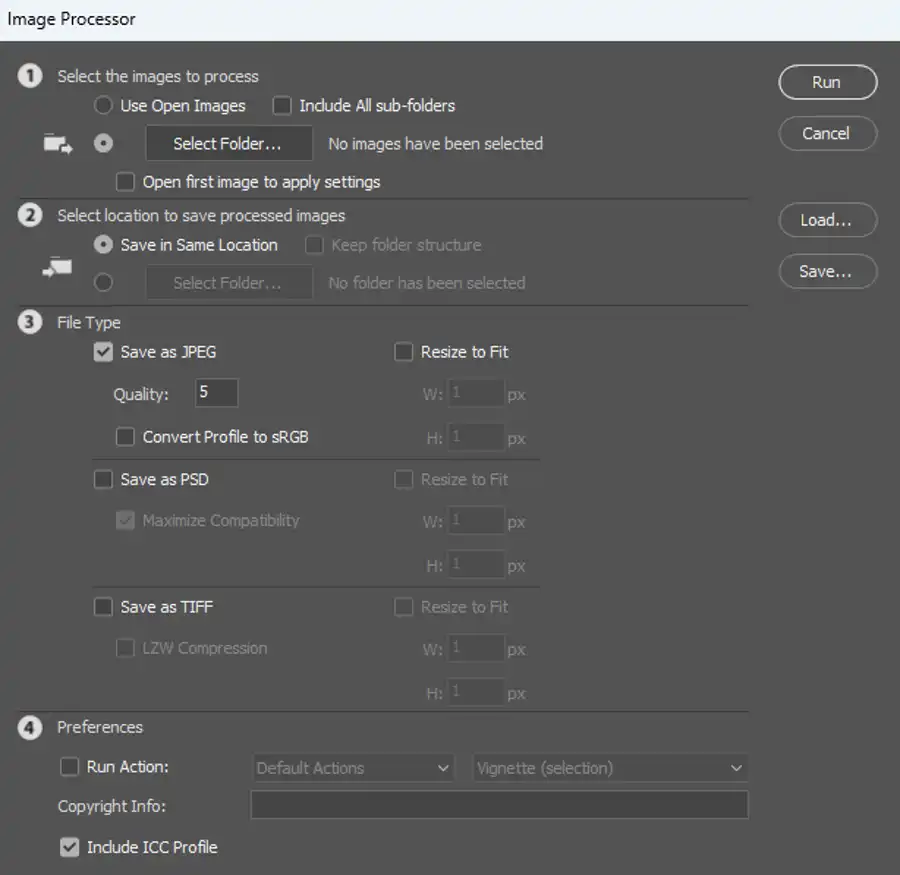
In the Image Processor window, click on the Select Folder button to choose the folder containing the images you wish to resize. You can also choose to select images from open files as an alternative.
Applying Changes for RAW Files
If some of your images are in RAW format, you can choose to edit them in batch using Camera Raw. Simply check the box to apply settings using Camera Raw, and save them out to a new folder.
Choosing Where to Save the New Files
Next, specify where you want Photoshop to save the resized images. You can choose to save them in the existing folder with a new name, save them in a new folder, or even save them in a different place on your computer. The choice is yours.
Picking a File Type
At this stage, you will need to choose how you want to save the resized images. JPEG is usually the best file format for web use, while PSD and TIFF files are more suitable for print formats.
Setting the Size Parameters
Setting the maximum width and height of the images is the next step. By entering your desired values, you can ensure the images are all properly sized. Make sure to leave the Constrain Proportions box checked so that the image isn't distorted when you resize it. It’s important to note that these dimensions are maximum values; images will not be cropped to fit if they are larger than the specified size.
If you are resizing for use on a website, we recommend saving the file at 72 ppi and the maximum width and height you want for that image, as this will increase the loading speed of your website. However, if you are printing your images, make sure to set the ppi to 300 or above so that they look good in print.
Running the Batch Edit
Finally, we come to the last step of the process, running the batch edit. Simply click Run in the Image Processor window, sit back, and watch as Photoshop processes your images. You will know that the batch editing is complete when the progress bar reaches 100%
Questions you might be asking
How do I resize a batch of photos at once?
To resize a batch of photos at once, you can use Adobe Photoshop or Adobe Bridge. In Photoshop, you can use the "Image Processor" feature to resize multiple images at once. Simply select the images you want to resize, go to the "File" menu, choose "Scripts," and select "Image Processor." In the Image Processor dialog box, choose the folder where your images are saved, choose the destination folder for your resized images, choose the image size you prefer, and click "Run." In Adobe Bridge, you can use the "Batch Rename" feature to resize images. Simply select the images you want to resize, go to the "Tools" menu, choose "Photoshop," and select "Image Processor."
How do I batch convert in Photoshop?
To batch convert files in Photoshop, you can use the "Image Processor" feature. Simply go to the "File" menu, choose "Scripts," and select "Image Processor." In the Image Processor dialog box, choose the folder where your images are saved, choose the destination folder for your converted images, select the file type you want to convert to, and click "Run." This will convert all the files in the folder to the file type you selected.
How do I batch resize in Photoshop and bridge?
In Photoshop and Bridge, you can batch resize images using the "Image Processor" feature. In Photoshop, select the images you want to resize, go to the "File" menu, choose "Scripts," and select "Image Processor." In the Image Processor dialog box, choose the folder where your images are saved, choose the destination folder for your resized images, choose the dimensions you prefer, and click "Run." In Bridge, select the images you want to resize, go to the "Tools" menu, choose "Photoshop," and select "Image Processor." Follow the same steps as in Photoshop to resize your images.
How do I resize an image quickly in Photoshop?
To resize an image quickly in Photoshop, you can use the "Image Size" feature. Simply open the image you want to resize, go to the "Image" menu, and select "Image Size." In the Image Size dialog box, enter the dimensions you want for your image, and click "OK." Your image will be resized to the dimensions you specified. Alternatively, you can use the keyboard shortcut "Ctrl+Alt+I" (Windows) or "Cmd+Option+I" (Mac) to quickly open the Image Size dialog box.