Creating an animated GIF can be a fun and engaging way to add some movement to your digital content. A GIF, which stands for Graphics Interface Format, is a compressed image file type that supports animation and can be shared across different digital platforms. While many social media platforms such as Twitter, Facebook, and Instagram support GIFs, they are also commonly used in marketing and advertising campaigns.
If you're wondering how to turn a series of photos into a looping animated GIF using Photoshop, the good news is that it's relatively easy to do. This technique works for creating a timelapse animation using a series of photos taken from a DSLR or point-and-shoot camera or even a mobile device. In this article, we'll walk you through the steps of creating an animated GIF in Adobe Photoshop.

To get started, open up Adobe Photoshop and follow these simple instructions:
Import a series of photos:
- Open up Photoshop and go to "File" > "Scripts" > "Load Files into Stack."
- Once the "Load Layers" dialog box appears, click "Browse" and select the photos you want to use for your animation.
- Click "OK" to import the images into Photoshop.
Import a video and turn frames into individual layers:
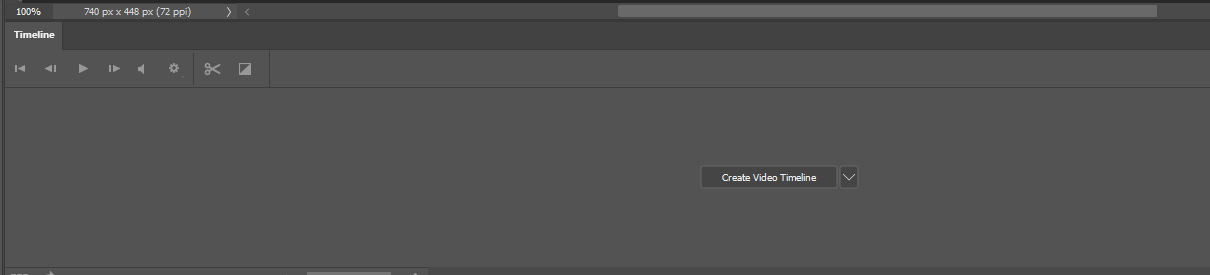
- Open up the video in Photoshop.
- Go to "Window" > "Timeline", and then select "Create Video Timeline".
- In the drop-down menu on the right side of the Timeline panel, select "Convert Frames".
- Select the frames you'd like to include in your animation.
- Go to "Layer" > "New" > "Layer Via Copy".
- Repeat this process until you have each frame on a new layer.
Converting layers into animation frames:
- Go to "Window" > "Timeline".
- In the Timeline panel, select "Create Frame Animation".
- Click "Create Frame Animation" to start creating your animation.
- Select the first frame in your Timeline panel.
- Click the visibility icon for the layers you want to include in the first frame of your animation.
- Set the duration for each frame.
Setting the animation to loop:
- In the Timeline panel, click the drop-down menu at the bottom right.
- Select "Forever" to loop your animation continuously.
Exporting the animation as a GIF:
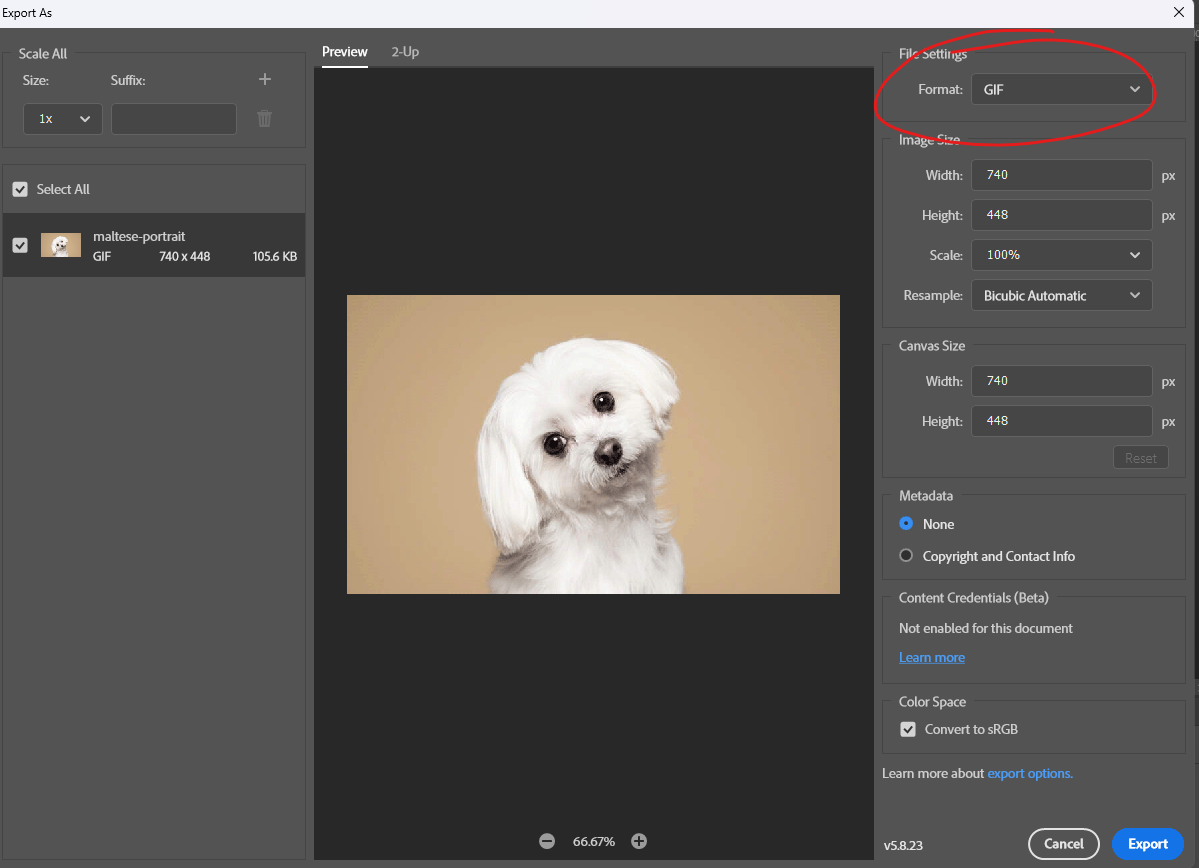
- Go to "File" > "Export" > "Save for Web (Legacy)".
- In the "Save for Web" dialog box, ensure that "GIF" is selected in the drop-down menu.
- Adjust the settings of your GIF, such as the size and delay.
- Click "Save" to save your new animated GIF.
Questions you might be asking
How do you export a GIF?
To export a GIF, you need to open your file in Photoshop and go to File > Export > Save for Web (Legacy). In the drop-down menu, select the GIF format and adjust the settings as desired. Click Save when ready.
Why can't I save my Photoshop file as a GIF?
This may be due to the file not meeting the requirements for a GIF format, such as the file being too large or containing too many frames. To save a file as a GIF, it must be a flattened image or a sequence of frames.
How to export an animated GIF in Photoshop with a transparent background?
To create an animated GIF with a transparent background, you need to first create each frame on a transparent layer. Once you have your frames complete, follow the steps to export a normal GIF and ensure that the "Transparency" option is selected under the "Matte" drop-down menu in the "Save for Web (Legacy)" window.
How do I export a GIF speed in Photoshop?
To adjust the speed of your GIF, you can select "Forever" or a specific duration under the "Looping Options" in the "Save for Web (Legacy)" window. You can also adjust the delay time between frames (measured in milliseconds) to speed up or slow down the animation.