Brightening eyes in a photograph is typically one of the most common requirements during a retouching session. Eyes can often appear dull, lifeless and lack character in a photo, and removing these blemishes can be a daunting task. Fortunately, we've assembled a quick and easy method to brighten and lighten someone's eyes in a photograph using only a single adjustment layer, a layer blend mode, and a brush.

Related: Where is the Options Bar in Photoshop?
Adding A Levels Adjustment Layer:

The first thing we need to do is add the levels adjustment layer above the image to brighten the woman's eyes. The adjustment layer needs to be added to decide which areas of the picture should be made brighter. This step ensures that we get the maximum control over the image without affecting the background.
Changing The Layer Blend Mode To "Screen":
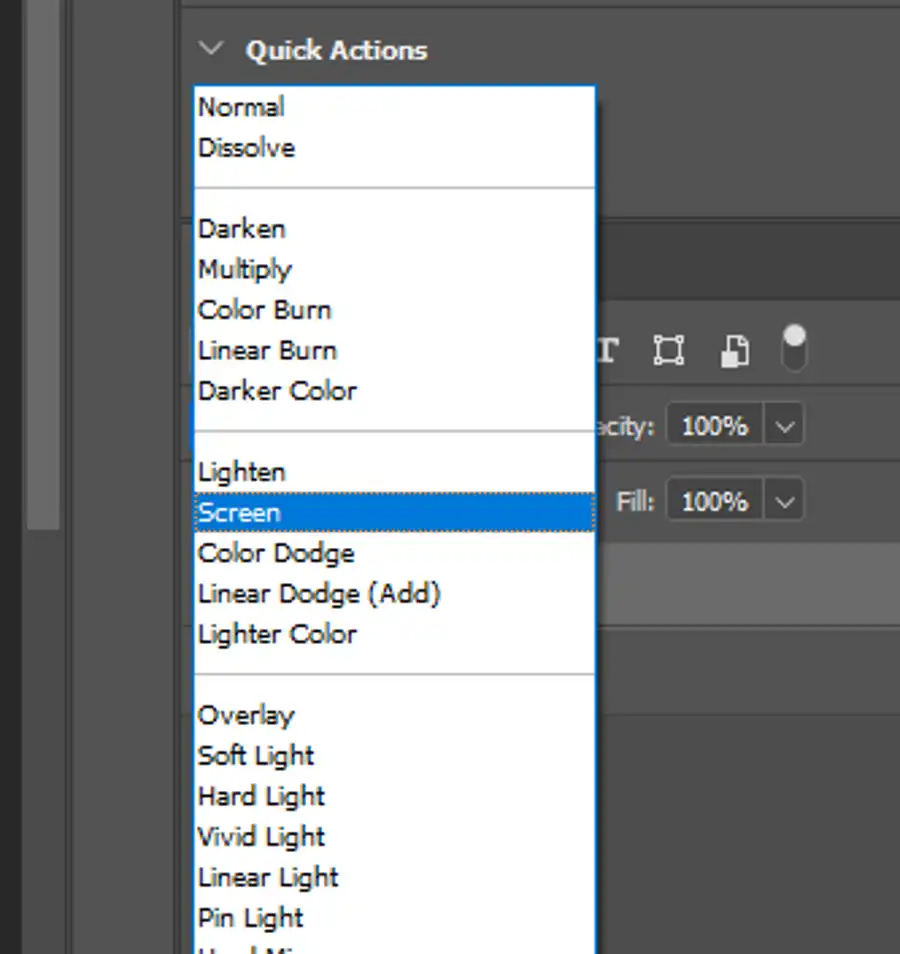
After adding an adjustment layer, change the layer blend mode to "Screen." The screen blend mode will brighten the image and make it look more vibrant. It will also reduce the amount of noise in the shadows. This step is crucial to generate the correct blend of brightness and contrast.
Also read: How to use Photoshop color replacement tool?
Filling The Layer Mask With Black:
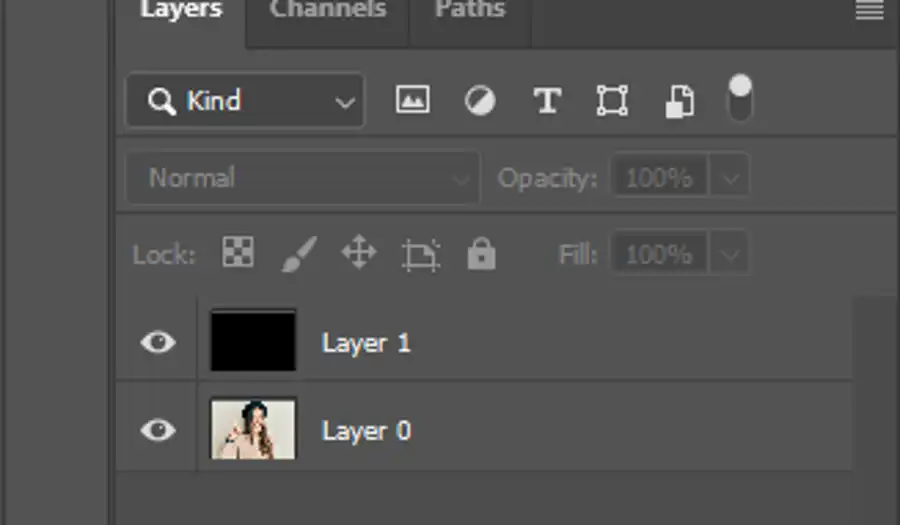
As the brightening effect needs to be applied only on the eyes, we use layer masks to control which parts of the picture the adjustment layer affects. To start, we fill the adjustment layer's layer mask with black. The black color works like a delete button, hiding the brightening effect from the entire picture.
Using The Brush Tool:
We now use the Brush tool to paint with white inside the iris of the eye to reveal the brightening effect. The Brush tool works in two ways: painting with black and painting with white. If we paint with black, the adjustment layer becomes invisible on that specific section, which is perfect for fixing unwanted elements in the picture. Conversely, painting with white exposes the adjustment layer on that precise region, which is precisely what we need for medical purposes.
Painting With White Inside The Eyes:
We now paint with white inside the iris of the eyes to reveal the brightening effect. We use a brush to apply the white color over the iris gently, making it brighter. By zooming into the region and using a small brush, we get optimal precision. This gives us a glimpse of how brightening changes the appearance of the eyes.
Questions you might be asking
How do I lighten my eyes in Photoshop app?
To lighten your eyes in Photoshop, you can use the Dodge Tool. First, select the Dodge Tool from the toolbar on the left-hand side of the screen. Make sure the brush size is appropriate for the size of your eyes, and choose a soft brush. Next, click and drag the Dodge Tool over the iris of the eye, being careful not to go over the edges of the eye. Repeat this process until the desired brightening effect is achieved.
How can I lighten my eyes in a picture?
To lighten your eyes in a picture, you can use any photo editing software with a brush tool. First, zoom in on the eye you want to lighten. Then choose a brush tool and select a soft brush. Next, lower the opacity of the brush to around 30-40%. Then brush over the iris of the eye, being careful not to go over the edges of the eye. Repeat this process until the desired brightening effect is achieved.
How do you fix dark eyes in Photoshop?
To fix dark eyes in Photoshop, you can use the Dodge Tool or the Brightness/Contrast adjustment layer. For the Dodge Tool, select the tool from the toolbar on the left-hand side of the screen. Make sure the brush size is appropriate for the size of your eyes, and choose a soft brush. Then click and drag the Dodge Tool over the iris of the eye, being careful not to go over the edges of the eye. Repeat this process until the desired brightening effect is achieved. For the Brightness/Contrast adjustment layer, select the layer from the Adjustments panel on the right-hand side of the screen. Increase the brightness slider until the desired effect is achieved.
How do I increase my eyes in Photoshop?
To increase the size of your eyes in Photoshop, you can use the Liquify filter. First, duplicate the layer containing the eyes. Then select the Liquify filter from the Filter menu. Choose the Forward Warp tool and increase the brush size to cover the entire eye. Then click and drag the center of the iris outward, being careful not to go too far. Repeat this process until the desired size increase is achieved. Finally, use the Clone Stamp tool to fill in any areas around the eye where the background or skin may have been distorted by the Liquify filter.