
Adobe Photoshop, the gold standard for graphic design and image manipulation, continually offers an array of impressive features. One such feature, the Puppet Warp, allows you to reshape objects within an image with high precision and smoothness. Whether you need to alter the posture of a human figure or change the shape of an object, Puppet Warp gives you the power to do it effortlessly. Today, we’ll dive deep into this innovative feature.

Understanding Puppet Warp
Before we delve into the "how-to", it's vital to know what Puppet Warp is. This feature lets you distort specific areas of an image via a mesh overlay and pins that control the warping behavior. Think of it like having a digital puppet where pins act as pivot points or joints.
Getting Started
Firstly, you'll need to have Adobe Photoshop installed on your device. For this guide, we'll be using the latest version as of 2023. If you're working with an older version, don't worry, the Puppet Warp tool has been around since Photoshop CS5, so your interface should be fairly similar.
Step 1: Open Your Image
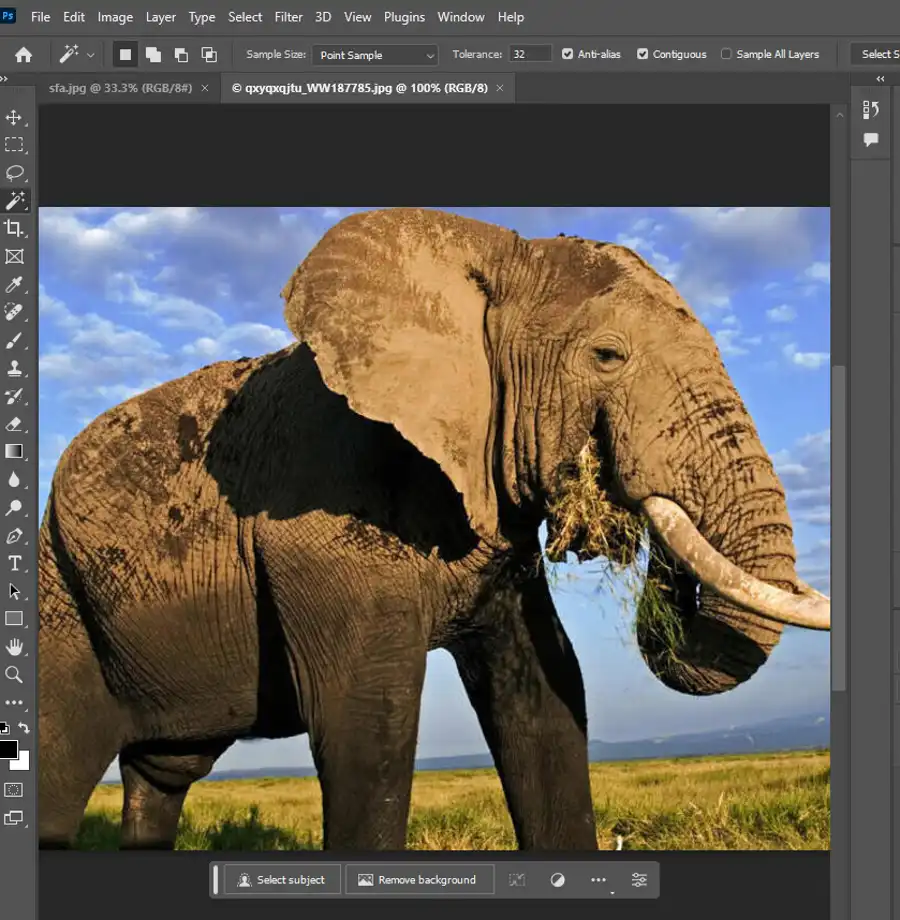
Launch Adobe Photoshop, and open the image you wish to edit. Go to File > Open and choose the file from its saved location.
Step 2: Create a Layer
Puppet Warp can only be applied to a layer, not the background. If your image only has a background, go to Layer > New > Layer from Background.
Step 3: Select the Object
Use the Quick Selection tool (W) or any selection tool you prefer to select the part of the image you want to warp.
Step 4: Separate the Object
Next, separate the object from the rest of the image to avoid warping everything. To do this, go to Layer > New > Layer via Copy (Ctrl+J on Windows, or Cmd+J on Mac). This creates a new layer with your selected object.
Step 5: Apply Puppet Warp
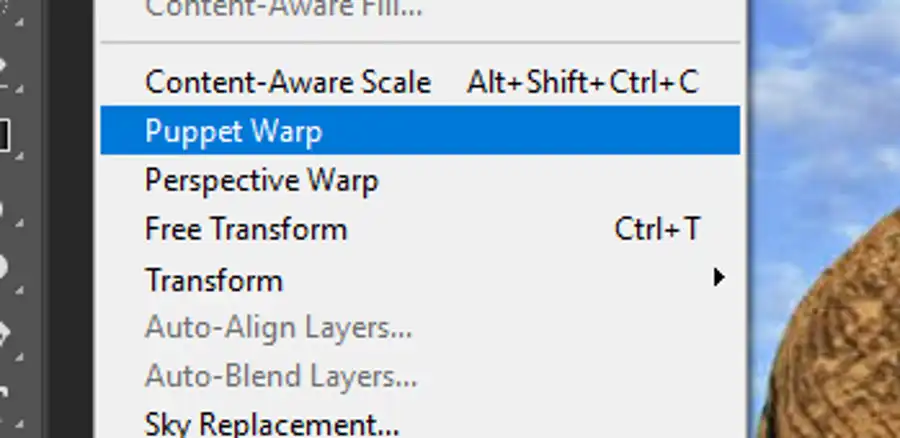
Now, it's time to warp. Go to Edit > Puppet Warp. This will create a mesh on your selected layer.
Step 6: Add Pins to Your Object
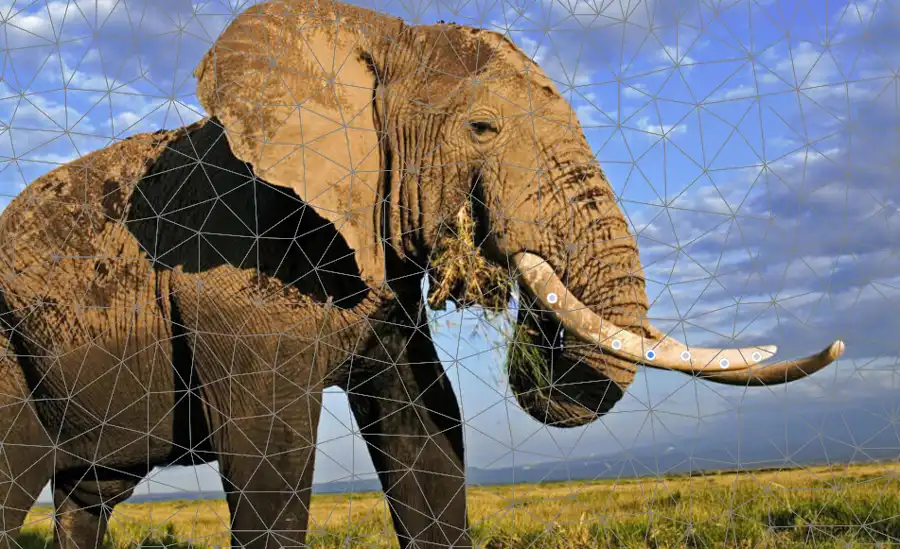
Next, click on the areas of the image you want to have control over to add 'pins'. Think of these as joints on a body. For instance, if you're working with a human figure, you might place pins at the elbows, wrists, knees, and ankles.
Step 7: Manipulate the Pins
Click and drag the pins to start warping the object. Each pin moves independently, but will also influence the other pins around it. If you want to move multiple pins together, hold Shift and click on the pins you want to group. You can then move them all as one unit.
Step 8: Adjust Puppet Warp Settings
On the options bar at the top of your screen, you can adjust the density of the mesh (from fewer points to more points), the expansion of the mesh outside your object, and the distortion mode (rigid, normal, or distort). The right settings depend on your specific image and desired results, so feel free to experiment.
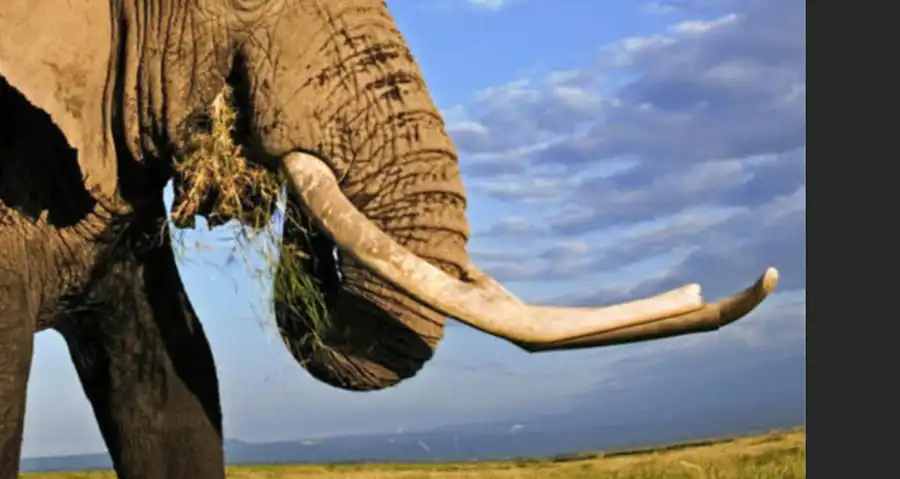
Step 9: Apply Your Changes
Once you're happy with your adjustments, click the checkmark on the options bar or press Enter to apply your changes.
Step 10: Refine Your Image
If the edges of your warped object seem harsh or unnatural, use the Eraser tool (E) or add a layer mask to blend it seamlessly with the background.
Questions you might be asking
How do you add a Puppet Warp in Photoshop?
Adding a Puppet Warp in Photoshop is easy and straightforward. First, you need to select the layer you want to use the Puppet Warp tool on. Then, go to Edit > Puppet Warp. This will open up the Puppet Warp dialog box, allowing you to manipulate your image.
How do I use Warp in Photoshop?
The Warp tool in Photoshop is similar to Puppet Warp, but it is used for different purposes. To use Warp, select the layer you want to work on and go to Edit > Transform > Warp. This will create a grid on your image that you can manipulate to distort your image.
How does Puppet Warp work?
Puppet Warp works by creating a grid over your image, allowing you to manipulate specific points on the grid to warp and distort your image. You can use this tool to make specific elements of your image move or bend, allowing you to fine-tune your composition.
What is the function of the Puppet Warp tool in Photoshop?
The Puppet Warp tool in Photoshop is used to adjust specific parts of an image while leaving the rest of the image intact. It allows you to warp specific parts of an image as if they were on a pivot point, which can help you achieve more precise edits to your images. This tool is especially useful for adding movement to an otherwise static image, such as when animating a character in a video game or animated movie.