Layer masking in Adobe Photoshop is a powerful tool used to create stunning effects and make precise edits to an image. Layer masks enable us to make bold edits without actually changing the image and are ideal for creating image composites, modifying backgrounds and removing or cutting out objects. In this tutorial, we will explore how to use layer masks.

What are layer masks?
A layer mask allows us to cut-out or hide certain parts of a layer. The hide effect comes from the use of black. When we paint with black on a layer mask, that part of the layer stays hidden, and when we paint with white, the hidden layer becomes visible again. A layer mask is created by selecting a layer and clicking on the layer mask icon in the Layers panel.
How to make a layer mask in 8 steps?
- Open Your Image: Start by opening your image in Photoshop. Click on
Filein the top menu, thenOpen...and navigate to the image you want to use. - Duplicate Your Layer: It's a good idea to duplicate the layer you want to apply the mask to, so you always have a clean version of the original. You can do this by right-clicking on the layer in the Layers Panel (normally on the right-hand side of your screen) and selecting
Duplicate Layer.... - Select The Layer: Click on the duplicate layer you've created to select it. This is the layer to which we're going to apply the layer mask.
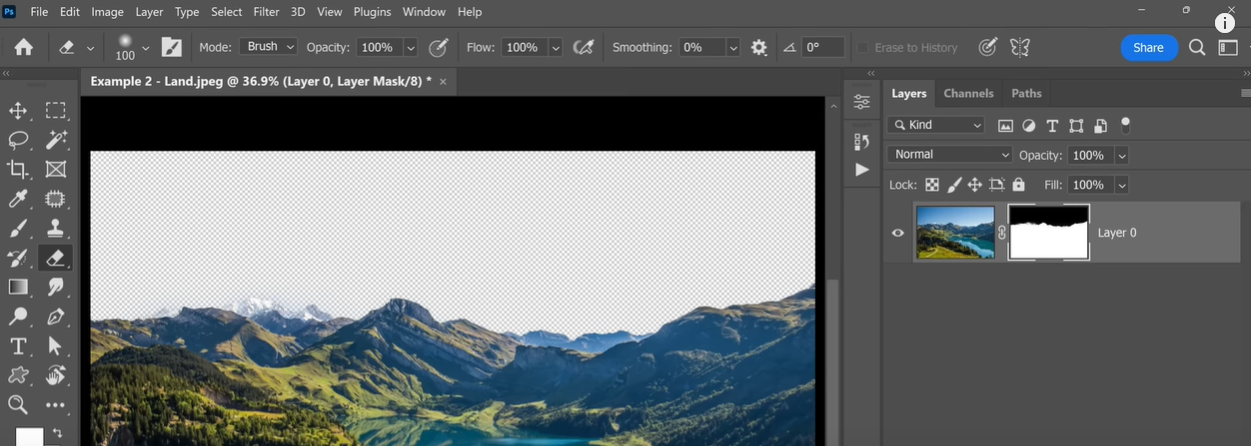
- Add Layer Mask: At the bottom of the Layers Panel, click the rectangle with the circle in the middle (Add Layer Mask). This adds a white layer mask thumbnail next to your layer thumbnail.
- Paint The Mask: Now, choose your Paintbrush tool from the toolbar on the left, and ensure that your foreground color is set to black (you can switch the foreground and background colors by pressing 'X' on your keyboard). Painting with black will hide the areas of the image, while painting with white will reveal areas.
- Edit the Mask: Now you can paint onto your image. The areas where you paint black will become 'masked' (hidden), while the areas you leave alone will remain 'unmasked' (visible). If you make a mistake, just switch your paint color to white and paint over the area to unmask it.
- Fine-Tune The Mask: If you need to, you can adjust the brush size, hardness, and opacity in the options bar at the top of the screen to fine-tune your mask.
- Apply the Mask: Once you're happy with your mask, you can apply it by right-clicking on the mask thumbnail in the Layers Panel and selecting
Apply Layer Mask.
What are the benefits to using layer masks?
- Feather, adjust, repeat
Layer masks come with several overlay and adjustment tools that help create realistic selections through feathering and refining techniques. The feathering tool adds a soft transition around the edges of a selection, making it blend seamlessly with the background. We can also refine a selection using the refinement tool to accurately select fine details in hair and fur. - Paint on edits to your masks:
We can also adjust layer masks by painting on them with black and white colors. Painting with white causes the painted area to become visible, while black hides it. We can play with opacity and grayscale to change the degree to which edits are applied. - Use vectors for precision:
Vector masks use math to create pixel-perfect lines and edges for selections, making them ideal for architecture and areas with straight lines. - Ease of editing:
The beauty of using layer masks is the ease of editing. We can use Photoshop tools like Brushes, Gradient tools, and the Eraser tool to edit them. We can also switch between painting and erasing on a layer mask to fine-tune our selection. - Masks for fine-tuned editing:
Layer masks help us make precise edits to an image, allowing us to create results that match our vision. - Target elements of layers:
Adjustment layers include layer masks, allowing us to change the contents of layers beneath them. We can selectively alter part of an image without having to edit layers individually. - Adjust hue and saturation:
We can adjust the color and vibrancy of an image by adding a Hue and Saturation Adjustment layer to a masked area. - How to add a layer mask to a layer:
We can easily add a layer mask by selecting the layer and clicking on the layer mask icon in the Layers panel. - Learn professional photo editing skills with masks:
Mastering layer masks helps us build professional editing skills. Tutorials are available to guide us through this powerful tool. - Discover fill layers:
Fill layers enable us to add color without altering the original layer. By using fill layers, we can test different styles and effects without damaging the original layer.
In conclusion, layer masks in Photoshop are a reversible way to hide parts of an image layer and are an ideal tool to add to your graphic design skills. They give more flexibility and confidence in editing images and enable you to create stunning effects.
Questions you might be asking
How do you create a layer mask?
To create a layer mask in Photoshop, select the layer that you want to add a mask to and click on the Layer Mask button at the bottom of the Layers panel. Alternatively, you can go to the Layers panel, right-click on the layer and choose "Add Layer Mask" from the dropdown menu.
How do I create a layer mask shortcut in Photoshop?
To create a layer mask shortcut in Photoshop, go to Edit > Keyboard Shortcuts. In the Keyboard Shortcuts and Menus dialog box, select "Shortcuts for: Application Menus" and select "Layer" from the dropdown menu. Scroll down to "Layer Mask" and click in the "Set Shortcut" box. Press the key combination that you want to use as the shortcut and click "OK" to save the changes.
How do I turn an image into a mask in Photoshop?
To turn an image into a mask in Photoshop, open the image and select the layer you want to turn into a mask. Click on the "Add Layer Mask" button at the bottom of the Layers panel. Then, hold down the Alt key and click on the layer mask thumbnail. Your image will now appear as a mask on the original layer.
Why can't I make a layer mask in Photoshop?
There are a few reasons why you might not be able to make a layer mask in Photoshop. Firstly, make sure that the layer you want to add a mask to is not a Background layer. Secondly, check that the layer is not a shape layer or a vector object. Finally, if the Layer Mask button is greyed out, make sure that you have selected the correct layer.