This post will go over vertex groups in Blender and how to use them to your advantage. We'll talk about what vertex groups are and how to choose one.
We'll go over applying a material to a vertex group and separating a vertex group in Blender step by step with visuals. You should have a good idea of how to use vertex groups in Blender and how they can help you with your 3D modeling projects by the end of this article.

If you don't have time to read the full article, here are three key takeaways:
2. To select a group of vertices, it can be done with the 'Border Select' tool, 'Lasso Selection', or 'Circle Select'.
3. Applying materials to vertex groups requires specialized software like Photoshop or Substance Painter and separating Blender's vertex groups is done by selecting them and pressing P then choosing Separate Selection.
What are vertex groups in Blender?
Vertex groups in Blender organize 3D models and produce animation. They can do simple shape alterations to complicated rigging and motion capture. Vertex groups are vertices that can be changed individually or as a group. This makes them useful for animating or controlling portions of a model.
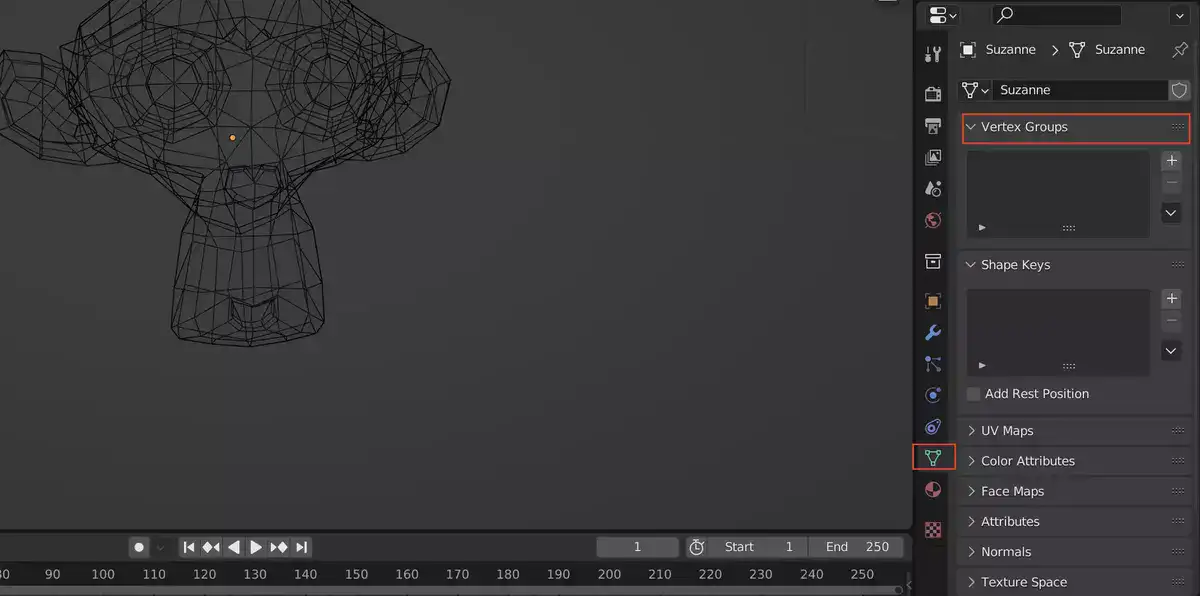
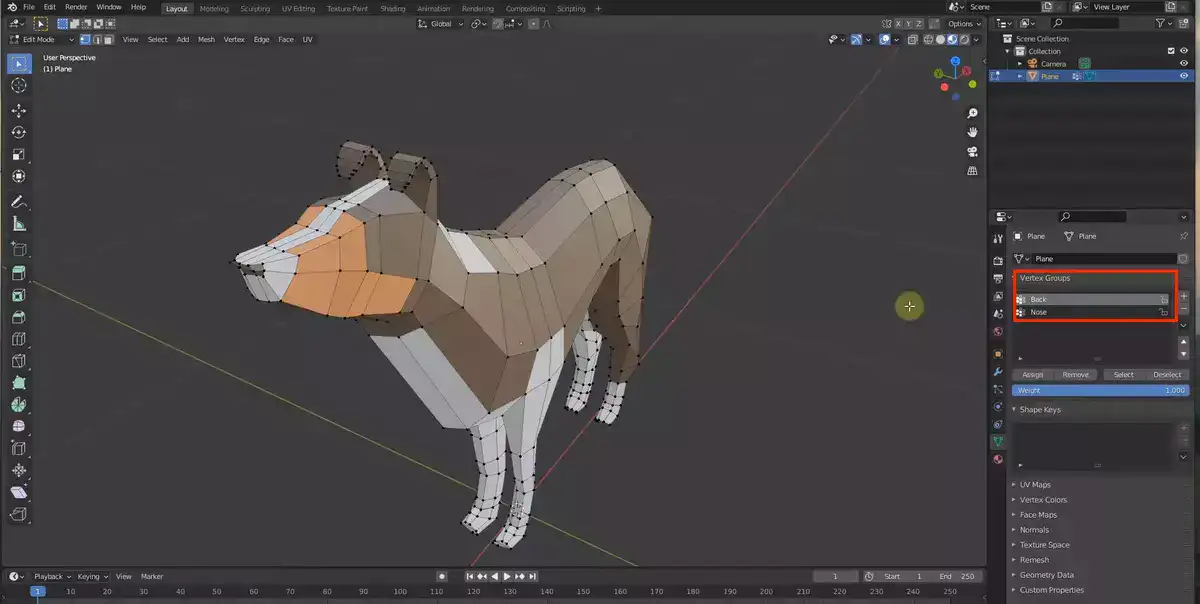
In the Properties window, click the + button next to Vertex Groups on the Object Data tab. This opens the Add Vertex Group dialog box, where you may name your new group.
How do you select a group of vertices?
Blender has numerous ways to select multiple vertices. The 'Border Select' Tool is most common one used by 3D designers, it's also my personal favorite. To use this tool, pick 'Vertex Select Mode' from the menu. Click and drag to pick the region. Moving your mouse allows you to quickly choose various spots.
Use 'Lasso Selection' to choose multiple vertices. You can then right-click and pick ‘Select Points Inside' or ‘Select Points Outside'. This method can be effective for hard-to-reach locations or sophisticated forms that can be swiftly picked with one pass of the lasso tool.
'Circle Select' is the final technique I recommend for selecting a set of Blender vertices. Using your mouse cursor, make an adjustable circle around all desired vertices, then hit enter/confirm. Circle Select is ideal for complicated or organic shapes like those found in ZBrush or Mudbox characters or models, which can have numerous small, delicate features.
There are several alternative methods for picking a group of vertices in Blender; it depends on the type of object and how large/complex its geometries are, but whichever method you choose should result in efficient and precise selections every time.
How do you apply a material to a vertex group?
3D modeling and design require applying a material to a vertex group. It uses specialist software to map textures and materials onto your 3D model. Select the vertex group to apply the material to. Open texture mapping software. Depending on the material and texture, this may be Photoshop or Substance Painter. Once you've opened the app, select a group of model vertices and choose a material. Adjust its features, including colors, hues, bumpiness, and reflectivity, based on the surface type.
Practice makes applying materials to vertex groups easy. Take time to modify little details after applying each one; this may involve fine-tuning parameters. It takes effort to precisely map textures onto complex models, but with enough experience you'll get better.
How do you separate a vertex group in Blender?
Separating Blender's vertex groups is a crucial step. It's easier than it sounds! It's typically straightforward to do.
First, select the group you want to break from your item. Click "Select" in the 3D viewport or use hotkeys like Shift+LMB for additive selection or Ctrl+Alt+LMB for box selection. After selecting all vertices to divide, press P while hovering over them and choose Separate Selection.
Go into Object mode and pick Mesh > Vertices > Separate By Vertex Group. You can separate by group or all selected vertices. Back in Edit Mode, label each new vertex group so they don't get muddled up.
If you edit any of these separated vertex groups after separating them, all changes will apply to all vertex groups, regardless of smaller divisions done before. When making modifications or adding details in these sections, consider how they'll effect other elements of your mesh.
Final words
Vertex groups are a powerful tool that every Blender user should know how to use. In this article, we've gone over what vertex groups are and how to select a group of vertices. We've also shown you how to apply a material to a vertex group and how to separate a vertex group in Blender. By following along with this article, you should now have a good understanding of how to use vertex groups in Blender and how they can help you with your 3D modeling projects.