Finding the best raw photo editing software can be a challenging task. With so many options available, it's important to know what you need for the type of camera you shoot with (DSLR or Mirrorless?). Whether you're an experienced pro or just starting out, I'm here to help you find the right software for your needs, with clear advice and plenty of tips along the way.

Adobe Photoshop

Adobe Lightroom

Corel PaintShop Pro

CyberLink PhotoDirector

Skylum Luminar Neo
Let's get started today on finding the perfect raw photo editing software that will give you stunning results every time!
Also read: Best DSLR photo editing app
How we tested?
We've tested over 15 desktop-based photo editing apps using RAW pictures taken with my Canon 80D DSLR at the highest resolution possible. We put each app through its paces, taking a close look at how it handles different kinds of images and the range of functions available. We determined that Adobe Lightroom was the best app for most users, as it has an intuitive user interface, powerful editing tools and is incredibly versatile when it comes to adjusting color tones, shadows and highlights. Plus, you can use it on both Macs and PCs.
Adobe Lightroom
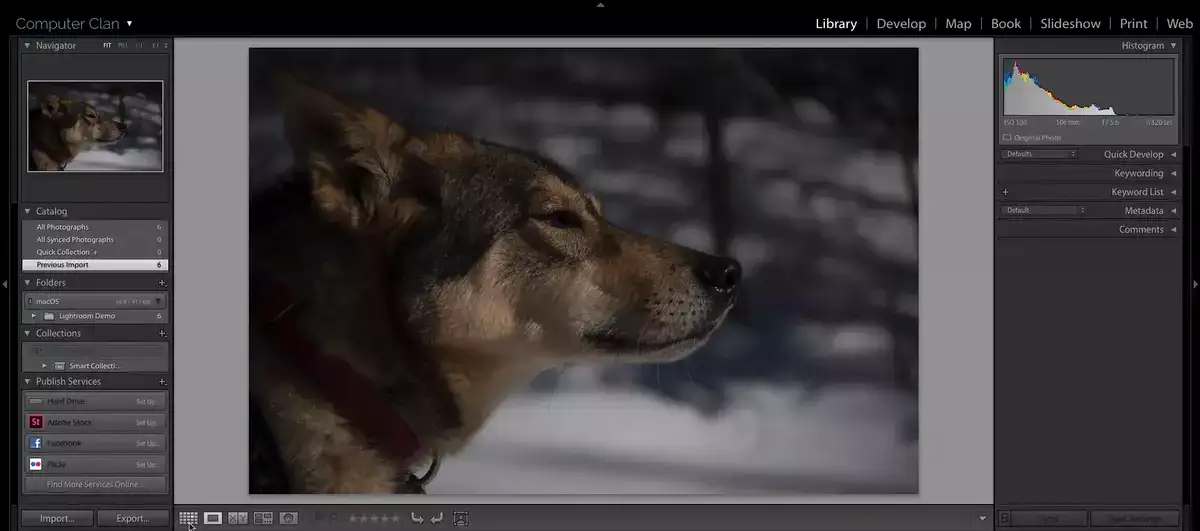
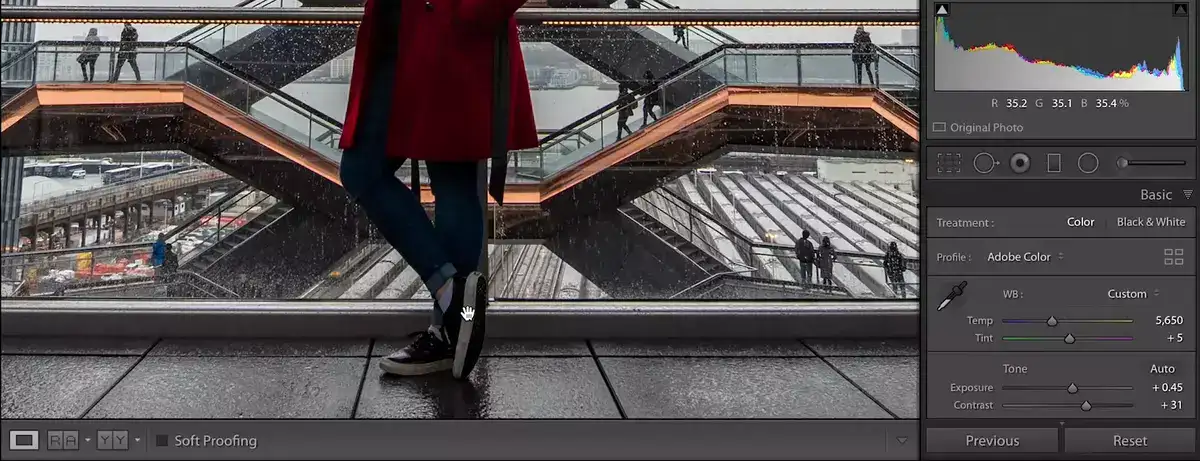
Lightroom is the most used app to edit RAW photographs regardless of the camera type or editing machine. It offers you all the base adjustment tools and features you'll need. Including a before & after view, a histogram, pre-made color templates and sliders for adjusting exposure, tone, contrast, shadows and all other color settings.
Lightroom includes other helpful features like batch processing which allows you to apply multiple edits across multiple files with just one click; this saves time when working on large projects that involve numerous similar images. Furthermore, the program supports a vast array of file formats including JPEGs, TIFFs and PSDs so you can easily adjust any type of image in your possession.
Also read: Best photo editing software to remove objects
Overall Adobe Lightroom is an excellent choice for anyone looking for a powerful photo editor with plenty of features and options available. It’s versatile enough for both professional photographers who want full control over every aspect of their images as well as casual hobbyists simply looking for quick fixes or enhancements like brightening up dull skies or removing red eye from portraits.
PROs:
• Directly transfer RAW photos from your camera to Lightroom
• Non-destructive workflow
• Powerful editing features
• Batch processing capabilities
• Supports various file formats
CONs:
• Require monthly subscription to Creative Cloud
• Can be overwhelming if used incorrectly
Luminar Neo
Luminar Neo is a relatively new photo editor for RAW photos that has been gaining popularity due to its powerful features and affordable price tag. It offers both automatic and manual editing options, allowing you to fine-tune images with precision.
As soon as you upload a RAW photo to Luminar NEO, you'll be greeted with DevelopRAW tool panel. This is where you'll be making your light and other DNG/DCP adjustments. You could reduce noise, play with light settings, change sharpness, curves and more.
It's also nondestructive similar to Photoshop & Lightroom. One of the main advantages of Luminar Neo is its ability to edit RAW files without having to convert them first. This makes it ideal for photographers who want the maximum level of quality without the extra steps. Additionally, you can use pre-set filters and effects in order to quickly enhance your images.
Pros:
• Easy user interface
• Ability to edit RAW files directly
• Excellent range of filters and effects
• High-quality prints & file sharing options
Cons:
• Figuring out how layering works could be a challenge.
Affinity Photo
Affinity Photo is a powerful photo editor that offers users the ability to edit RAW photos quickly and efficiently. It has all the features you would expect from a professional editing program, including layers, masks, curves and levels. The interface is easy to navigate and understand making this an ideal choice for those who want an efficient workflow when editing RAW photos. Affinity Photo also supports color profiles like Adobe RGB, ProPhoto RGB and sRGB which ensures that your edited images look great no matter what device or platform it’s viewed on.
One of Affinity Photo’s standout features is its HDR Merge tool which allows users to merge multiple exposures into one image with perfect exposure balance. This feature allows you to create stunningly realistic photographs without having to take multiple shots of the same scene in different exposures. Other useful tools include retouching brushes for smoothing out skin tones or quick edits such as spot healing, blemish removal and noise reduction. Additionally, Affinity Photo supports plugins like Topaz Batik allowing photographers more creative control over their edited images.
PROS:
- Easy-to-navigate interface
- Supports Adobe RGB/ProPhoto RGB/sRGB color profiles
- Powerful HDR Merge tool
- Useful retouching brushes and plugins
- Affordable price point compared to other photo editing software
CONS:
- Poor customer service response times
- Lacks some advanced features found in other programs such as Photoshop’s content aware fill
Adobe Photoshop

Adobe's Photoshop is capable of doing everything other photo editors we mentioned does and then some more. It's not just a basic photo editor, but a raster graphics editor. So, if you require more than RAW photo light editing, Photoshop will be your answer.
The software offers a range of powerful tools such as Selections, Healing Brush, Clone Stamp, Crop Tool, Layers and much more. The brush tool gives users the ability to quickly adjust tones in specific areas of the image allowing for precise adjustments without affecting other parts of the photo. The healing brush tool repairs any unwanted blemishes on images making them look pristine again.
Before you can jump to the main dashboard however, you'll need to confirm some settings from the Camera Raw panel that pops up when you import an image.
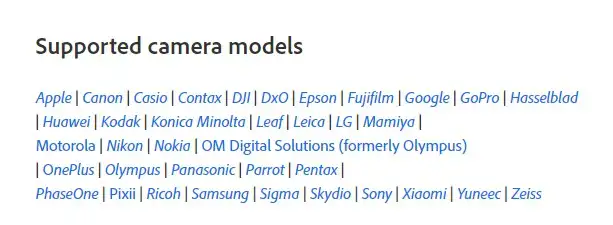
It supports all types and sizes of RAW pictures taken from virtually any camera including Apple, Canon, Nikon, Leica, Sony, Kodak and so many others. Here's a full list:
GIMP
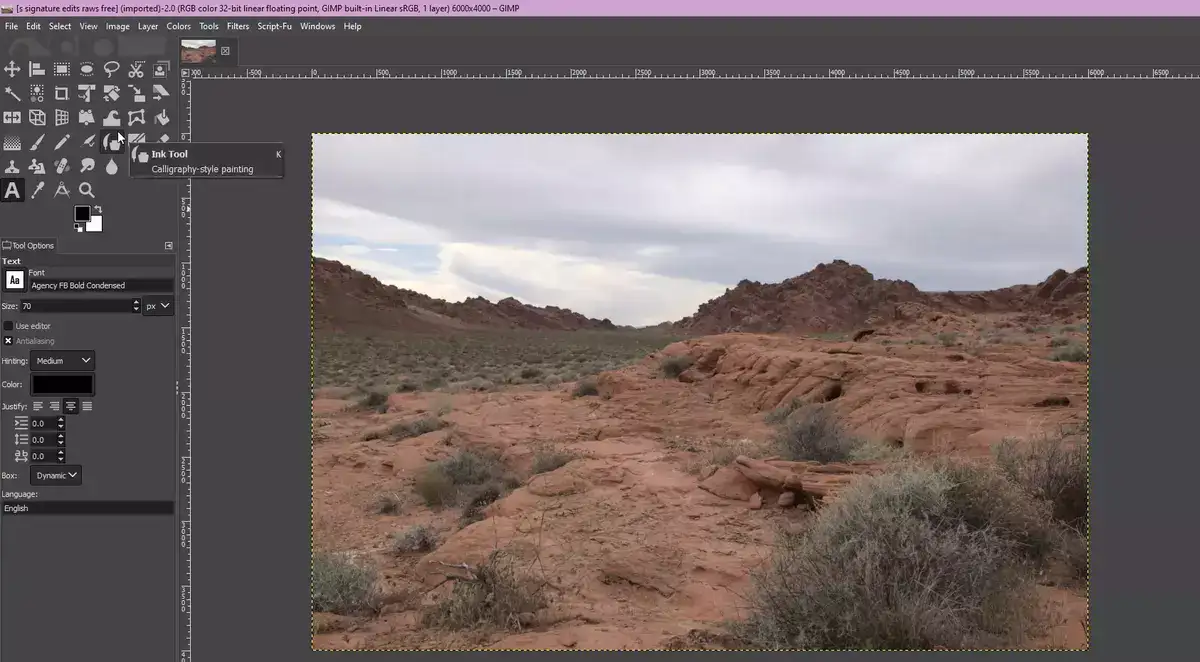
GIMP is a free, open-source photo editing software that can be used to edit raw photos. It has some very powerful features and an active user community with lots of support. While GIMP is not as popular as Adobe Photoshop or Lightroom (yet!), it is definitely a great option for those who are looking for a free alternative to edit RAW photos.
The main advantages of using GIMP to edit your RAW photos is the wealth of options available when it comes to adjusting color and tone. Color adjustments such as curves, levels and saturation can all be tweaked within GIMP and then exported into other formats like JPG or PNG. Similarly, exposure settings such as brightness, contrast, highlights and shadows can also be adjusted in GIMP before exporting final images. The software also offers tools for cropping, resizing or sharpening images if desired.
RawTherapee

RawTherapee is a great free, open-source RAW photo editor for Windows, Mac OSX, and Linux. It allows users to make incredibly detailed adjustments to their photos that would otherwise take hours in Photoshop or Lightroom. RawTherapee has some unique features such as exposure fusion which merges multiple exposures together into one processed image with better details and reduced noise. Also its color toning tool gives a realistic touch to images while preserving natural colors.
RawTherapee also offers some great tools for editing RAW files including tone curves, hue/saturation/luminance adjustment, denoising options like median filter or wavelet decomposition and more. With over 40 different parameters available it is able to do almost anything you need when working with RAW photos. You can even adjust the white balance of your shots using its powerful white balance tool which works surprisingly well even in low light scenarios where other editors might fail to deliver acceptable results.
Photopea

Photopea is an online photo editor and image manipulation platform developed by a Czech creator Ivan Kuckir back in 2013. It allows users to edit images in a variety of formats on the web, including RAW, meaning that, there are no applications to download on your PC. For those not familiar with RAW files, they are higher quality than JPEG or PNG files since they preserve more information from the sensor in the camera when taking photos. Although it requires more memory storage to save these types of files, the resulting edits can be much better since it provides more data to work with.
FAQ
What is a RAW photograph?

A RAW photograph is an uncompressed digital image file format. It contains all the data captured by a digital camera's sensor, offering users more freedom to edit and manipulate photos than other formats such as JPEGs or TIFFs. Raw images allow photographers to make greater adjustments with more flexibility in terms of color, exposure control, cropping, and white balance. This makes them ideal for professionals who need to maximize their creative potential while producing higher-quality results.
Unlike compressed formats such as jpg or webp, RAW pictures do not lose any data during the editing process due to its non-destructive nature. The data elements are instead stored separately which means that they can be adjusted without making permanent changes to the original image file. This allows professional photographers to experiment with different settings until they achieve the desired outcome without compromising quality or losing important details.
RAW files also give users finer control over color correction and tone mapping than other formats. Since each pixel is intact in its original form, it gives photographers the power to adjust saturation levels more precisely which can be beneficial when trying to create a certain look for a particular photo shoot or assignment.
Overall, RAW photography is an invaluable tool for professional photographers because it provides them with greater control over how their images turn out in post-production. With this powerful format at their fingertips, they're able to produce stunning results every time and unlock their true creative potential!
What is the best RAW photo editor?
Based on the conclusion of our research and thousands of photographer reviews we sifted through, the best RAW photo editor is Adobe Lightroom for all purposes and cases. It offers a variety of editing tools, presets and filters that make it the go-to choice for professional photographers
What is the best free RAW editing software?
GIMP is the best free RAW editing software because it allows full control of color correction, provides access to a wide range of plugins and filters, offers excellent support, and is open source. This makes it easy to customize and modify the program to fit the user's needs while still providing a powerful suite of tools for photo enhancement without having to pay huge upfront fees or monthly subscriptions that add up over time to enormous numbers.
How do I edit RAW photos?
Editing RAW photos is a skill that requires patience, precision and dedication. Every photo has its own unique characteristics and nuances, so editing them to perfection takes time. From adjusting the white balance and exposure levels to fine tuning color tones and gradients, RAW photos require a careful eye in order to transform them into stunning images.
The first step when editing RAW photos is to adjust the white balance. This involves selecting the correct color temperature of your image so that it appears natural in tone. Next, you can begin setting your exposure levels using either brightness or contrast sliders in order to bring out details within your shot. Now it’s time for some fine tuning adjustments - these are where you start getting creative! To add more impact to your image you can adjust the highlights and shadows, as well as applying picture-altering effects such as saturation or vignetting.
Toning is also an important part of editing a RAW file; here you will be able to select specific areas of color within the image and adjust their hue, saturation or lightness accordingly. Finally, use tools like clarity and sharpening filters to achieve an even clearer result by increasing texture detail if needed. The key thing is not to overdo it - subtlety is key when trying for realistic results! With practice and experimentation you will soon have mastered this craft!