Whether you're a professional portrait photographer or an amateur looking to improve your selfies, knowing how to smooth and soften skin in Photoshop can be a game changer. With the right tools and techniques, you can transform a dull, blemished complexion into one that is glowing and radiant. In this article, we'll take a look at some of the best ways to achieve smooth skin in Photoshop.

Introduction to Smooth and Soften Skin in Photoshop
Before we dive into the nitty-gritty of Photoshop's tools and filters, it's important to understand the underlying principles behind skin smoothing. While it's true that we all want flawless skin, a common mistake is to overdo it with the smoothing tools, which can lead to an over-processed, unnatural looking image.
The key to achieving a natural-looking smoothness is to retain the texture of the skin while reducing the appearance of blemishes and imperfections. One of the most effective ways to achieve this is by using Photoshop's Spot Healing Brush tool.
Step 1: Removing Unwanted Blemishes with Spot Healing Brush
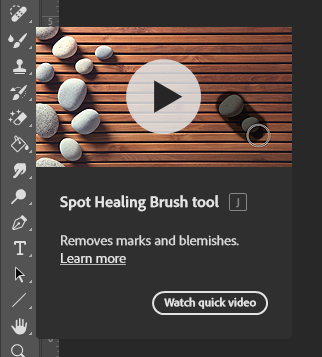
The Spot Healing Brush tool is one of the most useful tools in Photoshop for smoothing and softening skin. It has a clever algorithm that automatically replaces unwanted blemishes with pixels surrounding the area. To use it, simply select the tool from the toolbar and brush over the blemishes. The Spot Healing Brush tool works best on small, isolated blemishes such as pimples and freckles. For larger areas of skin imperfections, there is another technique we'll explore later in this article.
Step 2: Creating an Additional Layer and Applying High Pass Filter
The next step in achieving smooth skin is to create an additional layer and apply the High Pass Filter. This filter highlights the edges in the image, which helps to sharpen the image and retain the texture of the skin. To do this, create a duplicate layer of your original image, then invert the image by pressing Cmd/Ctrl + I.
Next, change the Blend Mode to Vivid Light. This will create a high-contrast image with clear edges. Now, apply the High Pass Filter from the Filter menu. Adjust the Radius slider until the edges are clearly defined, then click OK.
Step 3: Applying Gaussian Blur and Changing Layer Blend Mode
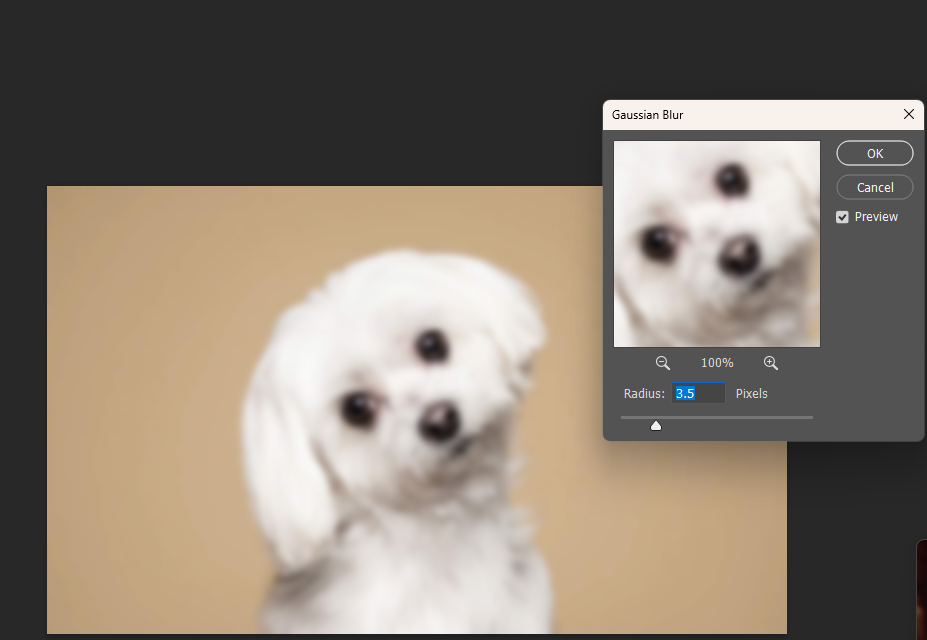
Now that the High Pass Filter has been applied, we can move onto the next step which involves applying Gaussian Blur to reduce harshness in the image. Select the duplicate layer with the High Pass Filter and apply the Gaussian Blur from the Filter menu.
After applying the Gaussian Blur, it's essential to change the layer Blend Mode to Soft Light or Overlay. This will help to blend the layer seamlessly with the original, creating a natural-looking image.
Mistakes you should watch out for
One of the biggest mistakes people make when smoothing skin in Photoshop is applying the effect to the entire image. This often results in an unnatural-looking image, as it can soften the details across the entire image, not just the skin.
To avoid this, we can use layer masks to confine the smoothing effect to the skin. To do this, add a Layer Mask to the duplicate layer, then use the Brush tool to paint over the areas of the skin that you want to apply the smoothing effect to. Keep in mind that when using this technique, it's important to use a soft brush for a natural-looking transition.
Pro Tip: Remove Blemishes Before Smoothening Skin
While the techniques we've discussed can help to create a natural-looking smoothness in the skin, it's important to remember to remove blemishes before you begin smoothing. Use the Spot Healing Brush tool to quickly remove blemishes, then do the initial cleanup before finishing retouching.
Conclusion
Photoshop provides a variety of tools and techniques for achieving smooth skin in your images. Whether you're a beginner or a seasoned professional, these techniques will help you achieve a natural-looking smoothness while retaining the texture of the skin. So go ahead and experiment with these techniques, and share your results with the Adobe Photoshop community.
Questions you might be asking
Can you smooth skin on Photoshop?
Yes, you can definitely smooth skin in Photoshop using a variety of tools such as healing brush, spot healing brush, patch tool, and clone stamp tool. Additionally, using filters like Gaussian Blur can also help to smooth out skin textures.
How do I get rid of bumpy skin in Photoshop?
To get rid of bumpy skin in Photoshop, you can use the Healing Brush tool to blend and soften the texture of the skin. You can also use the Clone Stamp tool to copy and paste smoother textures from an area with similar skin texture. Adjusting the brush size, opacity, and flow can give you better control over the touch-up process.
How do I smooth skin in Photoshop Raw?
You can smooth skin in Photoshop Raw by selecting the Spot Removal tool in the editing panel and applying it to blemishes or spots on the skin. Additionally, you can use the Adjustment Brush tool to soften the skin texture and reduce the appearance of fine lines and wrinkles. Using the Clarity slider can also help to create a softer, more even skin tone.
How do you retouch skin in Photoshop?
Retouching skin in Photoshop involves various tools and techniques, including the Healing Brush, Spot Healing Brush, Clone Stamp, and Patch Tool. You can also use the Dodge and Burn tools to brighten or darken specific areas of the face and smooth out skin texture. The Liquify tool is another popular option for reshaping and smoothing out facial features. It's important to use a light hand when retouching skin to avoid creating an unnatural look.