To speed up the Premiere Pro on Mac, you can use PowerMyMac to increase the system response time. It deletes the junk files, bugs, and clutter that slows the Premiere Pro. If you have small SSDs, it gets the hard disk storage back to run your Mac with the highest performance. PowerMyMac helps you to get more space on the disk drive. It's the best tool that you can use for removing unnecessary junk files and browser caches.

When your application system is out of memory, PowerMyMac will make you get space and save time. It prevents the clutter up to 62 GB which causes Mac to slow down.
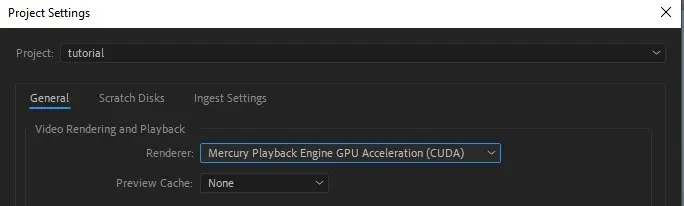
How to Turn on GPU Acceleration Premiere Pro?
Premiere Pro uses GPU Acceleration for rendering or playback. If you turn that off, you will get a longer render duration and laggy playback.
To activate GPU Acceleration, go to File > Projects Settings > General and check for "Renderer". Then find "Video Rendering and Playback" in the menu. You should choose "Mercury Playback Engine GPU Acceleration." afterward.
Mac has two options: Open CL and Metal. Try both and decide the best for your system. You may want to avoid "Mercury Playback Engine Software" on Mac.
Why is Premiere Pro so laggy?
Premiere Pro has a huge file size, and the requirements to download Premiere pro may be high for some computers, so it may cause some lag if your computer specifications don't match it. Also, your computer's RAM plays a big role in it, and problems caused by insufficient RAM aren't easy to fix apart from upgrading it. We recommend at least 8GB of RAM for modern versions of Premiere Pro, but you can still use Premiere Pro on 4GB RAM devices if you install older, less resource-intensive versions.
Please check our more extensive tutorial on why is my Premiere Pro so laggy.
There are four ways that you can reduce lag issues.
1- Turn on GPU Acceleration
While generating the project's settings, make sure you set the Renderer to GPU Acceleration. If it's greyed out, it means that the option isn't available on your device. If that's the case, make sure you have a GPU correctly installed on your machine.
2- Lower Playback Resolution
If you lower the Playback Resolution, it'll make a huge difference to decrease the lag problems. You can adjust it to 1/2 or 1/4 on the Preview Window settings. Also, you can avoid the lags by making the High-Quality Playback disabled.
3- Clean Up Media Cache Files
Old media files can cause a lag. Delete the unused files to prevent slowing. Programs such as CCleaner come in handy for that purpose.
4- Save Cache Files to a Secondary SSD
For the best performance, the last thing that we can advise you is to save your cache files to another SSD. It's very beneficial to increase the computer's performance for Premiere Pro. This even could be an external drive if you're not able to add another internal SSD to your hardware.