Adobe Photoshop is a versatile tool used by designers, artists, and photographers globally. One of its many features is the ability to trace images, which allows you to create li ne art, replicate shapes, or add specific details to your designs. This blog post will guide you through the process of tracing in Photoshop.

Understanding Tracing
Before we get started, let's clarify what tracing is. Tracing in Photoshop involves using a semi-transparent layer to see an image and another layer on top where you draw or trace the outline of that image. This technique is useful when you want to digitize sketches or create digital line art from a photo.
Step-by-Step Guide on Tracing in Photoshop
Here's a detailed, step-by-step guide on how to trace an image in Photoshop:
Step 1: Open Your Image in Photoshop
Start by opening Adobe Photoshop on your computer. From the menu at the top of the screen, select "File," then click "Open" and choose the image you want to trace. Your image will open in a new Photoshop document.
Step 2: Create a New Layer
Next, create a new layer for your tracing. Click on the "New Layer" icon at the bottom of the Layers panel (it looks like a sheet of paper with a corner folded). This layer is where you'll do your tracing.
Step 3: Adjust the Opacity of Your Image

To make the tracing easier, reduce the opacity of your original image. Select the layer of your original image in the Layers panel, then adjust the Opacity slider at the top of the panel. A setting between 50% to 70% should work well. The image should be faint but still visible enough for you to see the details for tracing.
Step 4: Select the Brush Tool
Select the Brush tool from the toolbar on the left. You can adjust the size, hardness, and color of the brush at the top of the screen to fit your tracing needs. Typically, a hard brush with a small size works best for tracing.
Step 5: Begin Tracing
Ensure that the new layer you created (Layer 1) is selected, then start tracing the image on this layer. Take your time and follow the lines of your original image.
Step 6: Refine Your Tracing
Zoom in and out as needed while you trace to achieve a more precise outline. You can use the Eraser tool to correct any mistakes.
Step 7: Finalize Your Tracing
Once you're happy with your tracing, you can remove the original image. Click the eye icon next to the original image layer in the Layers panel to hide it. Now, you will see only your tracing.
Step 8: Save Your Work
Finally, don't forget to save your work. Go to "File" > "Save As," then choose your desired file format (typically PSD for editable files or JPEG/PNG for final images).
Questions you might be asking
How do you image trace in Photoshop?
Image tracing in Photoshop is a useful technique for converting a raster image into a vector image. Here are the steps to do it:
- Open the image you want to trace in Photoshop.
- Select the image layer and go to Layer > Duplicate Layer.
- With the new layer selected, go to Filter > Stylize > Find Edges.
- Go to Image > Adjustments > Threshold and adjust the slider until you have the desired level of detail in your image.
- With the threshold set, go to Layer > New Adjustment Layer > Invert.
- Finally, go to Layer > Rasterize > Shape.
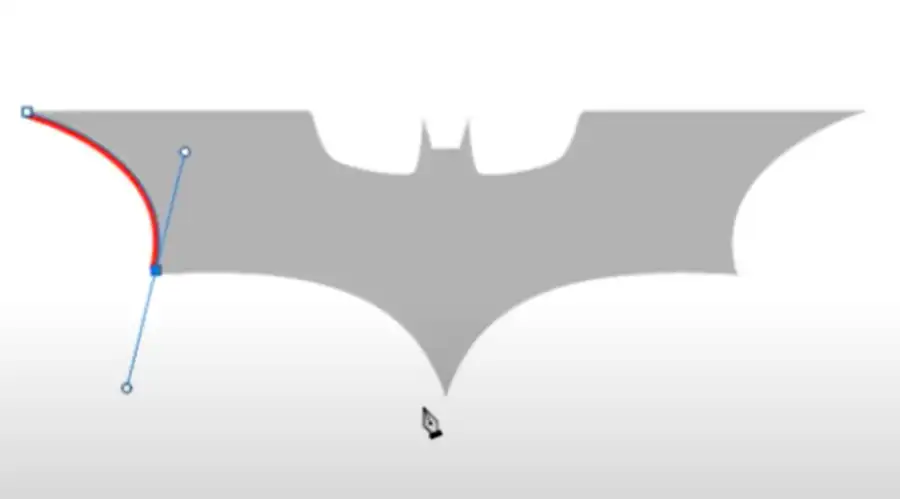
How do I manually trace an image in Photoshop?
Manually tracing an image in Photoshop allows for more control over the final output. Here are the steps:
- Open the image you want to trace in Photoshop.
- Create a new blank layer on top of the image layer.
- Using the Pen tool, start tracing the outline of the image.
- Once you have traced the entire image, remove the original image layer to reveal your traced image.
- Adjust the anchor points and curves as needed to refine the traced image.
How do I trace an outline of an image?
Tracing the outline of an image is a quick technique to extract a shape or object from a larger image. Here are the steps:
- Open the image you want to trace in Photoshop.
- In the Layers panel, click on the image layer to select it.
- Go to Layer > Duplicate Layer.
- With the new duplicated layer selected, go to Layer > Layer Mask > Hide All.
- Using the Brush tool, paint over the areas of the image you want to trace and reveal the layer beneath it.
- Once you have traced the entire outline, adjust the layer mask as needed to refine the final output.
Is there Image Trace on Photoshop?
While Adobe Illustrator has an Image Trace feature, there is no direct Image Trace tool in Photoshop. However, there are several tracing options and techniques available in Photoshop to achieve similar results. The methods above are some of the ways to achieve image tracing in Photoshop.