Video noise and grain impact the video quality, and you can adjust them to get desired results. Video noise is the little dots you see in videos shot in difficult conditions.
You may want to add grain or noise as an added effect on your videos, but this is usually done after you are done editing your footage and is never added on stock footage.

Noise appears due to various reasons such as underexposed footage, incorrect camera settings, or shooting the video in inadequate light for your camera/lens.
How to Remove Video Noise and Grain in Premiere Pro
Most Adobe Premiere Pro editors look for ways to remove video noise and grain using the software without plugins. This seems like a big task on hand, but fortunately for people who can’t afford to buy plugins, here is the good news; you can remove video noise and grain in Premiere Pro without using paid plugins like Neat Video or Red Giant’s denoiser. There is no denying that using plugins will give better and refined results, but for people who don’t have a lot of workloads, a no plugin approach can do wonders as well.
If you want to buy a plugin, it is better to go with Neat Video because Adobe endorses it.
Method 1: Using Median Effect
Steps for Removing Video Noise and Grain in Premiere Pro
Step 1: Add Median Effect

· Add footage to your Timeline.
· Go to the effects panel on the right side of your screen and search for Median.
· Drag and drop it to your clip.
Step 2: Mask only the Grainiest Portions of the Video
· Select the pen tool, move the mask around the screen, and resize it to cover the area.
· Add some extra points to your mask shape to make it fit.
· Increase the feather setting to +100, so the effect’s visible edges disappear.
· Repeat the process until you have covered the grainy area of your shot.
Step 3: Radius Setting
Please note that the Median effect doesn’t remove graininess. It blurs it out. To remove the graininess, you’ll have to change the radius settings until you achieve the desired results.
Method 2: Using VR Effect
· Add video to your timeline.
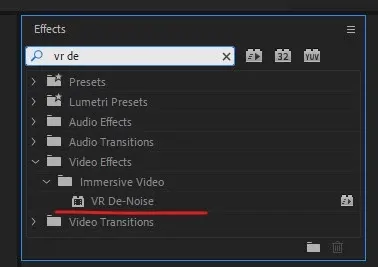
· Go to the effects section and type VR, you will see a lot of VR effects listed there. Look for and select VR denoise.
· Please note that the default settings on this effect are too high for normal use. So you will have to drop it down to make it usable. A setting of .02 will result in a good effect.
· Now zoom in on your video and check that the noise has disappeared.
Tradeoff When Denoising
Please note that you may lose some details after denoising. It is better to keep as much detail and sharpness in the video as you can. But you can’t do much about it, as this is the tradeoff when you remove video noise and grain in premiere pro.
Final Words
It is important to mention that free plugins show limited results, and you may not like them. However, combining the above-discussed methods with a paid plugin gives you awesome results.