Ripple delete is one of the significant steps for a beginner in video editing, and it provides you to the opportunity to edit more quickly and effectively. Knowing how to ripple deleting in Premiere Pro helps you improve your video editing skills and become a better video editor overall. The methods we'll cover let you delete a bunch of gaps on your timeline as well as how to use the rolling edit tool.


Ripple delete in Premiere Pro is a tool that you can use to delete the content between two clips with one click. It deletes the selected clip and combines the two clips on either side together. With the ripple edit tool, whenever you move the right or left handles of a clip, the adjacent clips to the clip you're working with, automatically move and shuffle outward or inward based on how you're adjusting your clip.
Select, delete or ripple delete clips

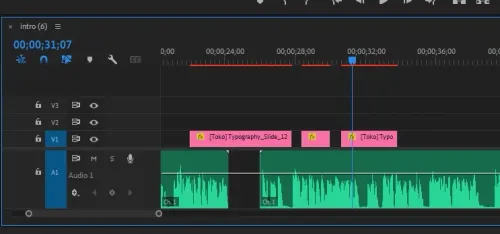
Initially, you should check if your settings are correct before starting to use this tool. Afterward, you must ensure that all the layers you want to cut or protect from cuts are correctly adjusted. You can control the locks on the labels “V1, V2, V3, A1, A2, A3”. If these labels are in blue, it means that ripple delete will be applied on them. If they are not specified in color, it demonstrates that they will be locked and not be affected. If you want to edit a particular layer, you can easily unlock it, but if you don't want to edit it, you can lock it by clicking on the lock button. After you adjust your layers, you can use the Ripple Delete Tool.
How to ripple delete in Premiere Pro?
Firstly, make your cuts in your Timeline as you wish, and then right-click on the place you want to delete and select the "Ripple Delete" from the menu. It will fill the space left in the Timeline while using ripple delete. To make it work on all unlocked layers. "Locked" layers will not be affected by changes. Additionally, a simple keyboard shortcut can be useful.
The difference between delete and ripple delete is while the delete tool removes a clip and leaves a gap, ripple delete doesn't leave any gap between the clips and saves you time.
How to use ripple delete shortcut in Premiere Pro?
To adjust ripple delete in Premiere Pro as a shortcut, you can click on the top bar and follow these steps.
- Go to Premiere Pro
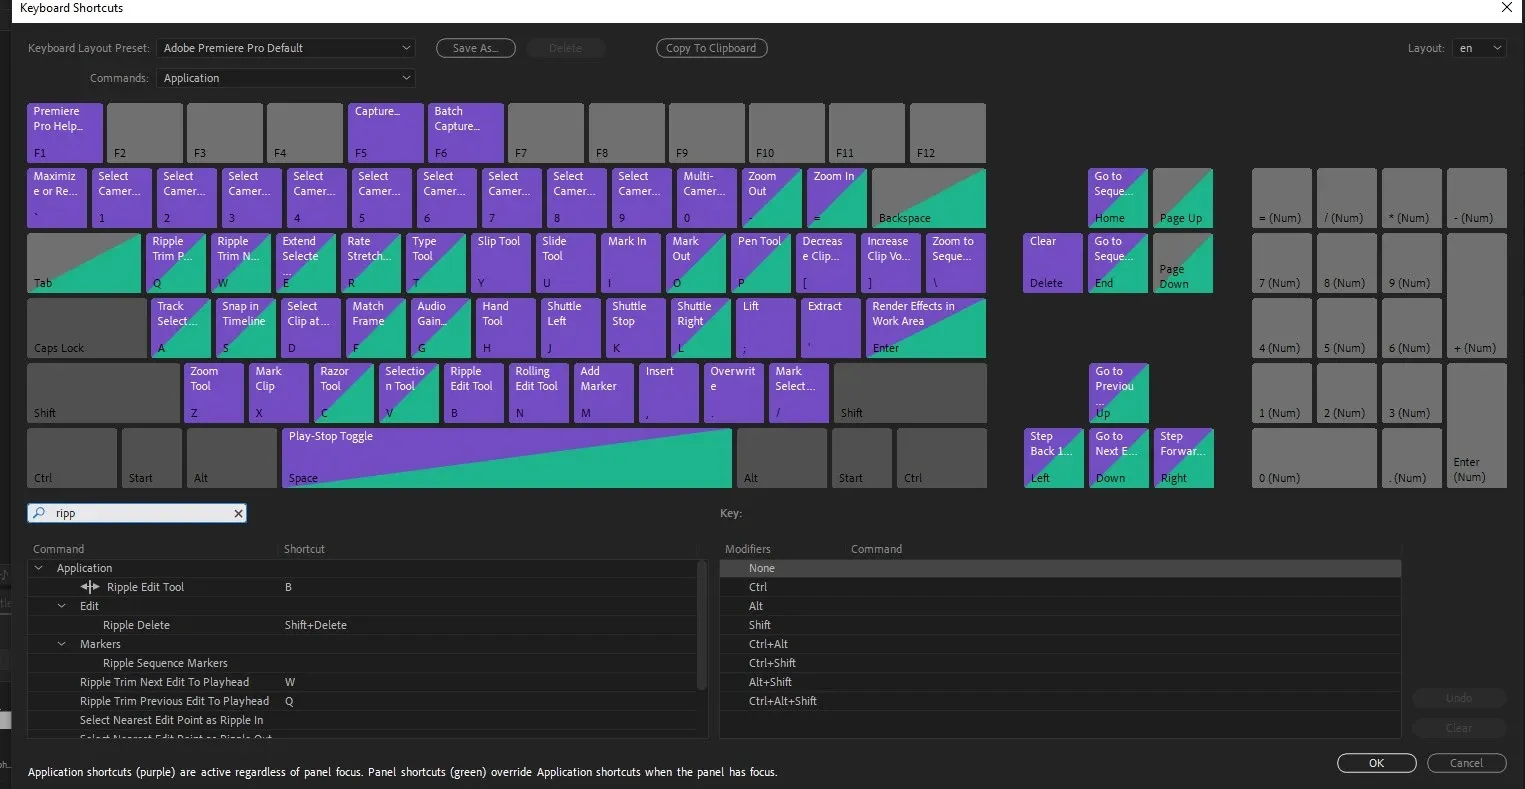
- Find Keyboard Shortcuts inside the Edit menu. You could also use CTRL+ALT+K shortcut to access it quickly.
- Find Ripple Delete in the selection. Alternatively, search for it.
Select your desired letter on the keyboard and match the ripple delete with that letter. For instance, you can choose the "B" letter. You can make sure that you've locked or unlocked the right layers by following these steps.

Ripple delete shortcuts in Mac and Windows
It's available to you through your selection tool with a modifier key. If you were the hit V, bring back up to selection tool, and if you're around any edit point and you hold command on Mac or Ctrl on Windows, that automatically turns your cursor into the ripple edit tool or the rolling edit tool depending upon how far the cursor is from your edit point. Once you release command then your cursor turns back into the normal selection tool. While utilizing the selection tool that's possible by going up to Premiere Pro> Prefences>Trim and select the box that says 'allow selection tool to choose Roll and Ripple trims without modifier key'. Now the default for how your selection tool acts has flipped. It acts as the ripple or rolling edit tool. If you need to access how to selection tool used to work, all you have to do is hold the command on Mac or Ctrl on Windows, and you'll see the red bracket with one arrow.
Why can't I ripple delete in Premiere Pro?
One of the reasons that we encounter frequently is you may have locked any layers that you tried to ripple delete on. You can easily set the locked layer to 'unlocked' by clicking on letters and numbers. For instance, V1, which is next on the Timeline. Then it will let you use ripple delete. If the problem still exists, checking the audio layers can be useful. Audio can block the system from time to time. Check the audio to make sure if it's unlocked.
V1 and A1 assemble the clips together to fill in the space. When it's locked, you will not be able to combine the audio so it will block the ripple delete in Premiere Pro.