
What is Adobe Premiere Pro?
Premiere Pro is a timeline-based video editing software by US-based software development company, Adobe. Thanks to its unmatched capabilities and tools, intuitive user interface, and other powerful capabilities, it won our Editor's Choice Award, which we'll get into shortly.

What's New & Latest Updates;
Adobe's 2021 update to Premiere Pro introduced many new features that its users loved.
Adobe Stock Audio
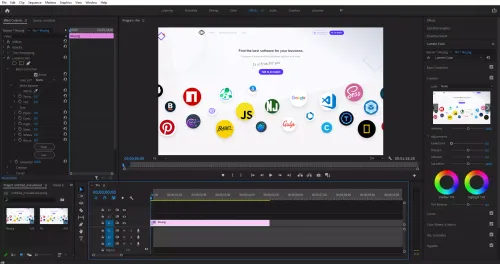
You now have free access to thousands of free Stock Audio right from your Essential Sound panel. Bring up your Essential Sound panel from Windows top menu to get started. Next to edit, you'll find a new Browse tab where you can access and buy royalty-free music. Options this new feature brings to the platform include sorting by mood, type, genre, filters such as tempo and duration, and whether the track should have vocals or not. Also, audio partner selection between Epidemic Sound and Jamendo. Perhaps the most useful innovation that comes with Adobe's new Stock Audio integration is that it lets you preview the audio together with your video clip to see how the output will look without editing files in the timeline. Just click on the preview button, and your video will render with the audio!
And if you think the background stock audio is too loud while previewing it, you could also adjust that within the panel using a slider audio controller. It doesn't get any easier than in any other video editing tool.
Scene Edit Detection
Scene Edit Detection in Premiere Pro is another brand new 2021 feature that lets you cut a video clip automatically. It is especially useful when you're working on color grading and need to apply different styles of color correction to different parts of the clip. The old method would be zooming in on the clip, identifying frames you need to cut. Now, click on the clip, select Scene Edit Detection, and watch Premiere Pro cut your clip up automatically and perfectly in seconds.
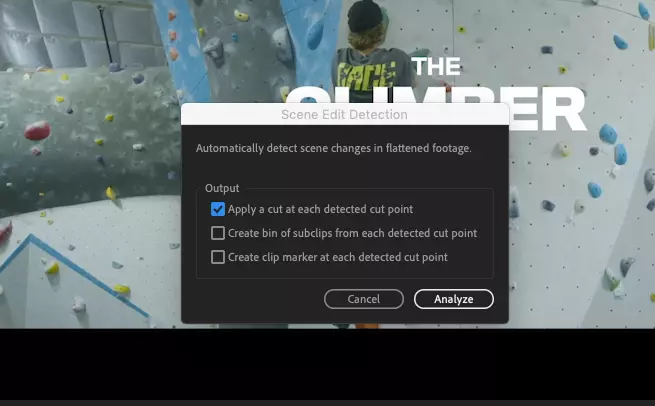
You have 3 options to choose from:
- Apply a cut at each detected cut point
- Create a bin of sub clips from each detected cut point
- Create a clip marker at each detected cut point
You can select multiple options.
Performance Improvements
Adobe's August update brought Accelerated Hardware Encoding, and now Windows users get a much faster and smoother decoding process for MPEG-4 (H.264) and HEVC formats. In our tests, playbacks are up to 30% faster in the 15.4.1 version compared to previous versions.
Premiere Pro Speech to Text
Normally to have subtitles enabled in your videos, you would have to generate an SRT file from the transcription of your video and import it to your workspace. Adobe, however, has now completely upped the game with their latest automatic Speech to Text transcription tool. All you need to do is click on the "CC" button that you'll find inside your timeline editor.
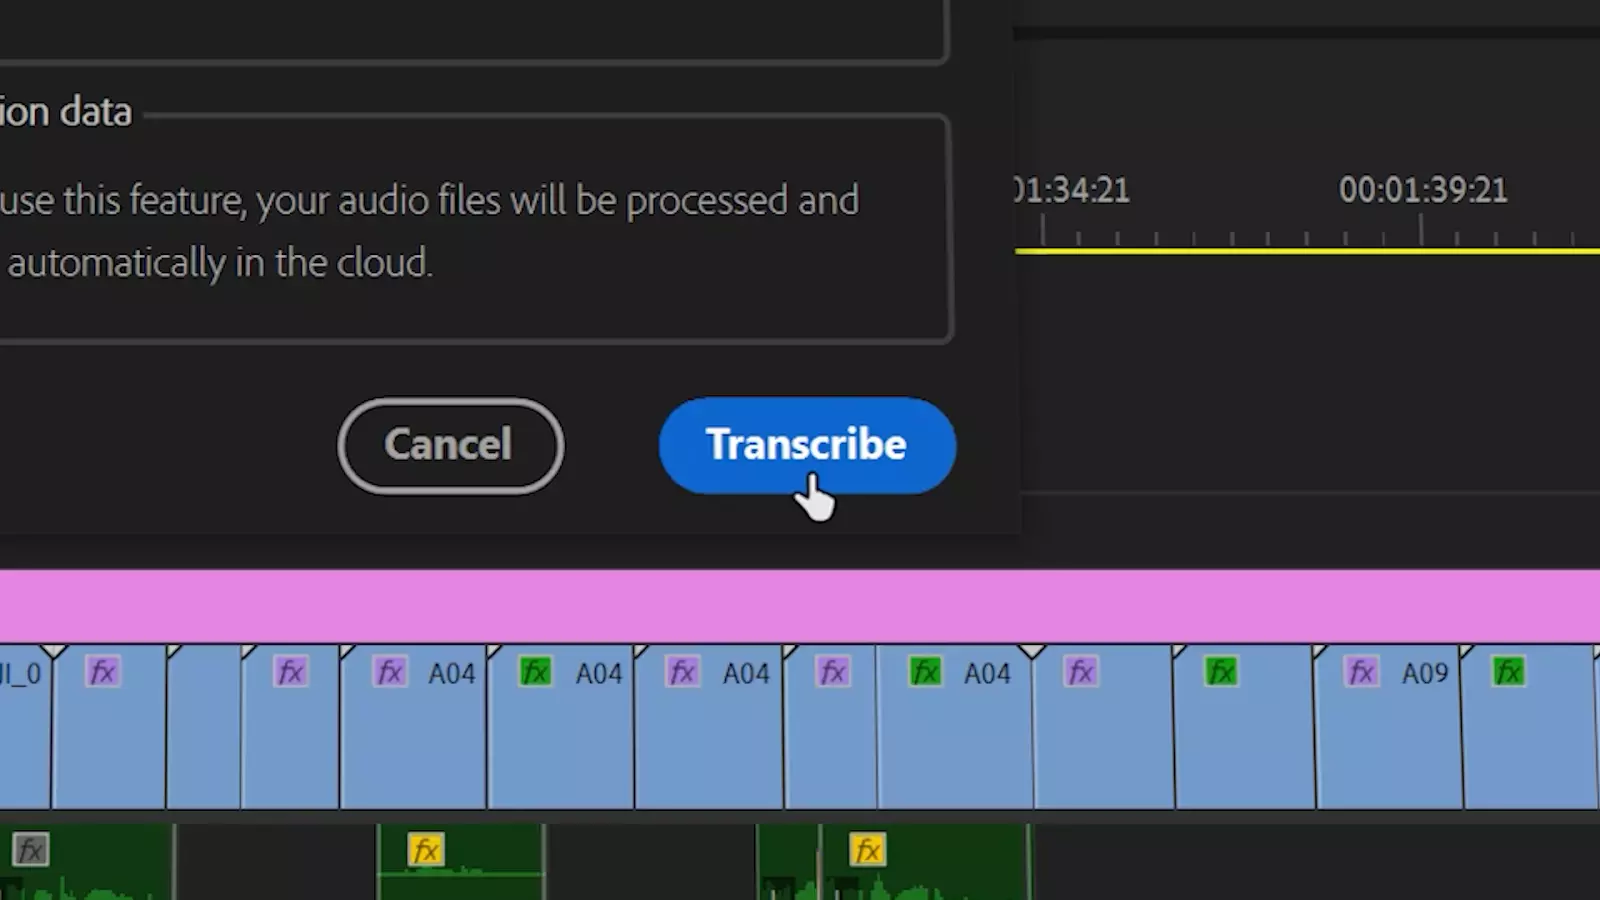
It is another first, fully integrated solution from Adobe that you won't find elsewhere that lets you create automated captions all within the application.
The best part is that it's included within your subscription at no cost to you. From transcript to captions, its Speech-to-Text algorithm works perfectly, automating the time & money-consuming tasks while giving you complete control over the look and feel of the captions.
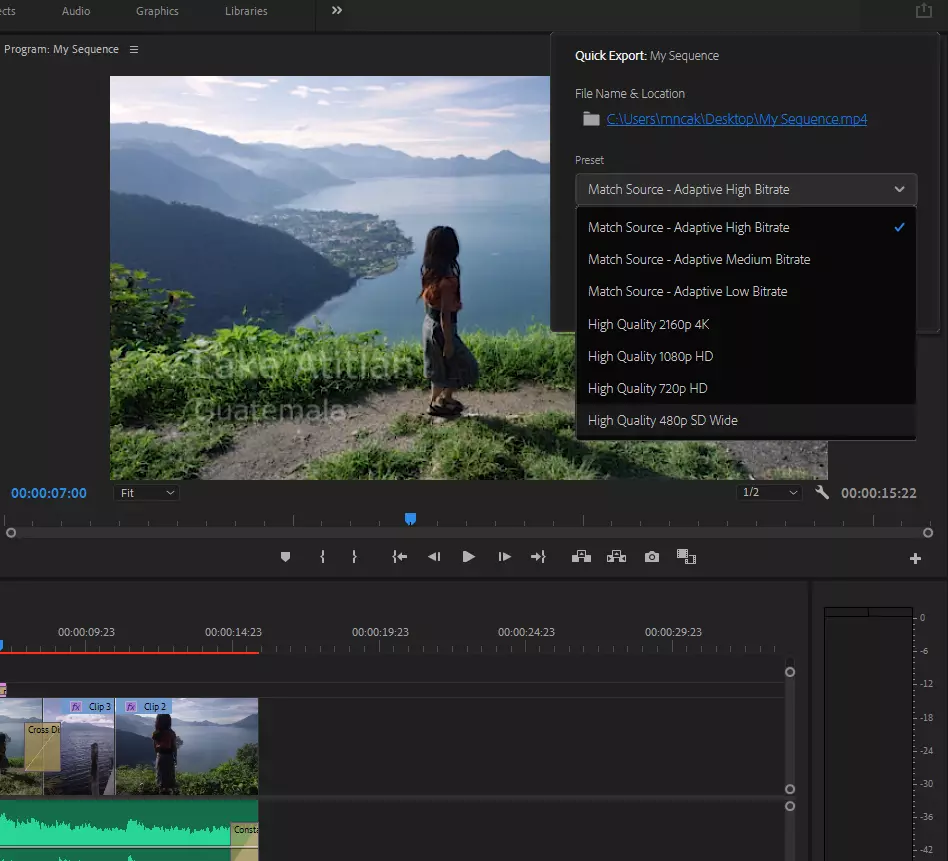
Quick Export
In 2020 Adobe introduced a new feature in Premiere Pro called Quick Export. As you can tell from the name, it allowed a quick way to export your clips using pre-defined settings. To use it, click on the "Quick Export" button on the top right section of your screen. From the popup menu, select where the output file should be saved. You also get quick preset options that are optimized for videos that are going to be published for the web, so they are all in H.264 format.
Premiere Pro for MACs
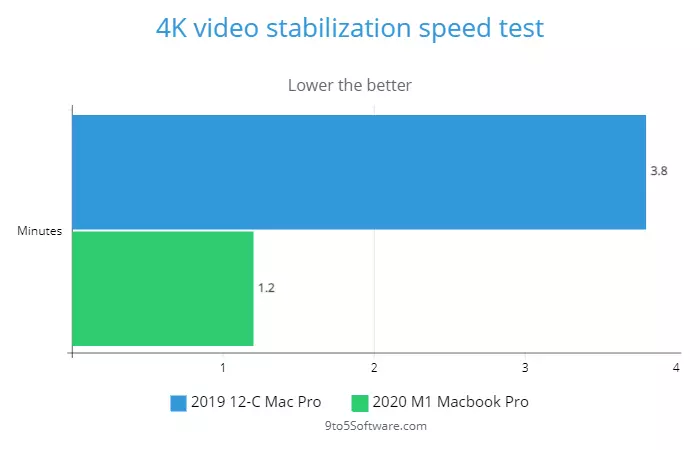
Adobe recently launched a new version of Premiere Pro 2023, which natively fully supports M1 Macbook Pros. It finally drains less battery and works smoother on your device. In our tests, it took 1.2 minutes for a 2020 M1 MacBook PRO to apply footage stabilization on a 30 second long 4K footage.
Rendering & Playbacks are up to 3x faster as well while using only half the CPU. Rendering the same 30 seconds long 4K footage took us 8:12 minutes while using only 25-30% of the available CPU. Even though Premiere Pro is now much faster on lower-end M1 Macs, you still get faster render speeds on Apple's own Final Cut Pro and even Davinci Resolve using the same device. Final Cut Pro rendered the same clip in 3 minutes 65 seconds while Davinci Resolve taking only 4.52 minutes.
If you're running Premiere Pro on lower end computers, read these tips we've got for you to get a smoother experience from your video editing process.
User Interface
Compared to its simpler alternatives, Premiere Pro doesn't have the easiest-to-understand and most intuitive user interfaces out there. However, they've recently rolled out several game-changing updates to streamline editing, one of which is a new way to import your media files to your media panel. Adobe Premiere has 4 main panels, offering a docked, panel-based user interface. The best thing about Adobe's workspace layout is completely customizable, unlike its alternatives. You can change your workspace colors, program monitor settings, add a plugin interface, manipulate their size on your screen, etc.
If you are serious about video editing and depend on Premiere Pro as a professional, you must consider customizing your UI because the stock one Adobe offers is ineffective.
Understanding the layout
When you open premiere pro, you'll be greeted with a welcome screen. From there, you can either open an existing project or create a new one to make a fresh start. If you click on the new project, the pop-up will let you set a name and change its settings, including video, audio, codec, capture, and ingest settings. Most people will be fine just editing the project name. Once you click okay, you'll be launched into the main, stock Adobe Premiere Pro user interface.
You have 4 main parts:
Project Media Panel
This panel located in the lower-left section of your interface holds all of your media files, including videos, photographs, and graphics. You can store these media files to add them to your timeline later. There are 3 different ways to import files into your project media panel. The easiest is simply dragging and dropping your media files into the box. Or, if you prefer the hard way, you can right-click on the section, click on import, browse your folder and import your preferred files.
Timeline panel
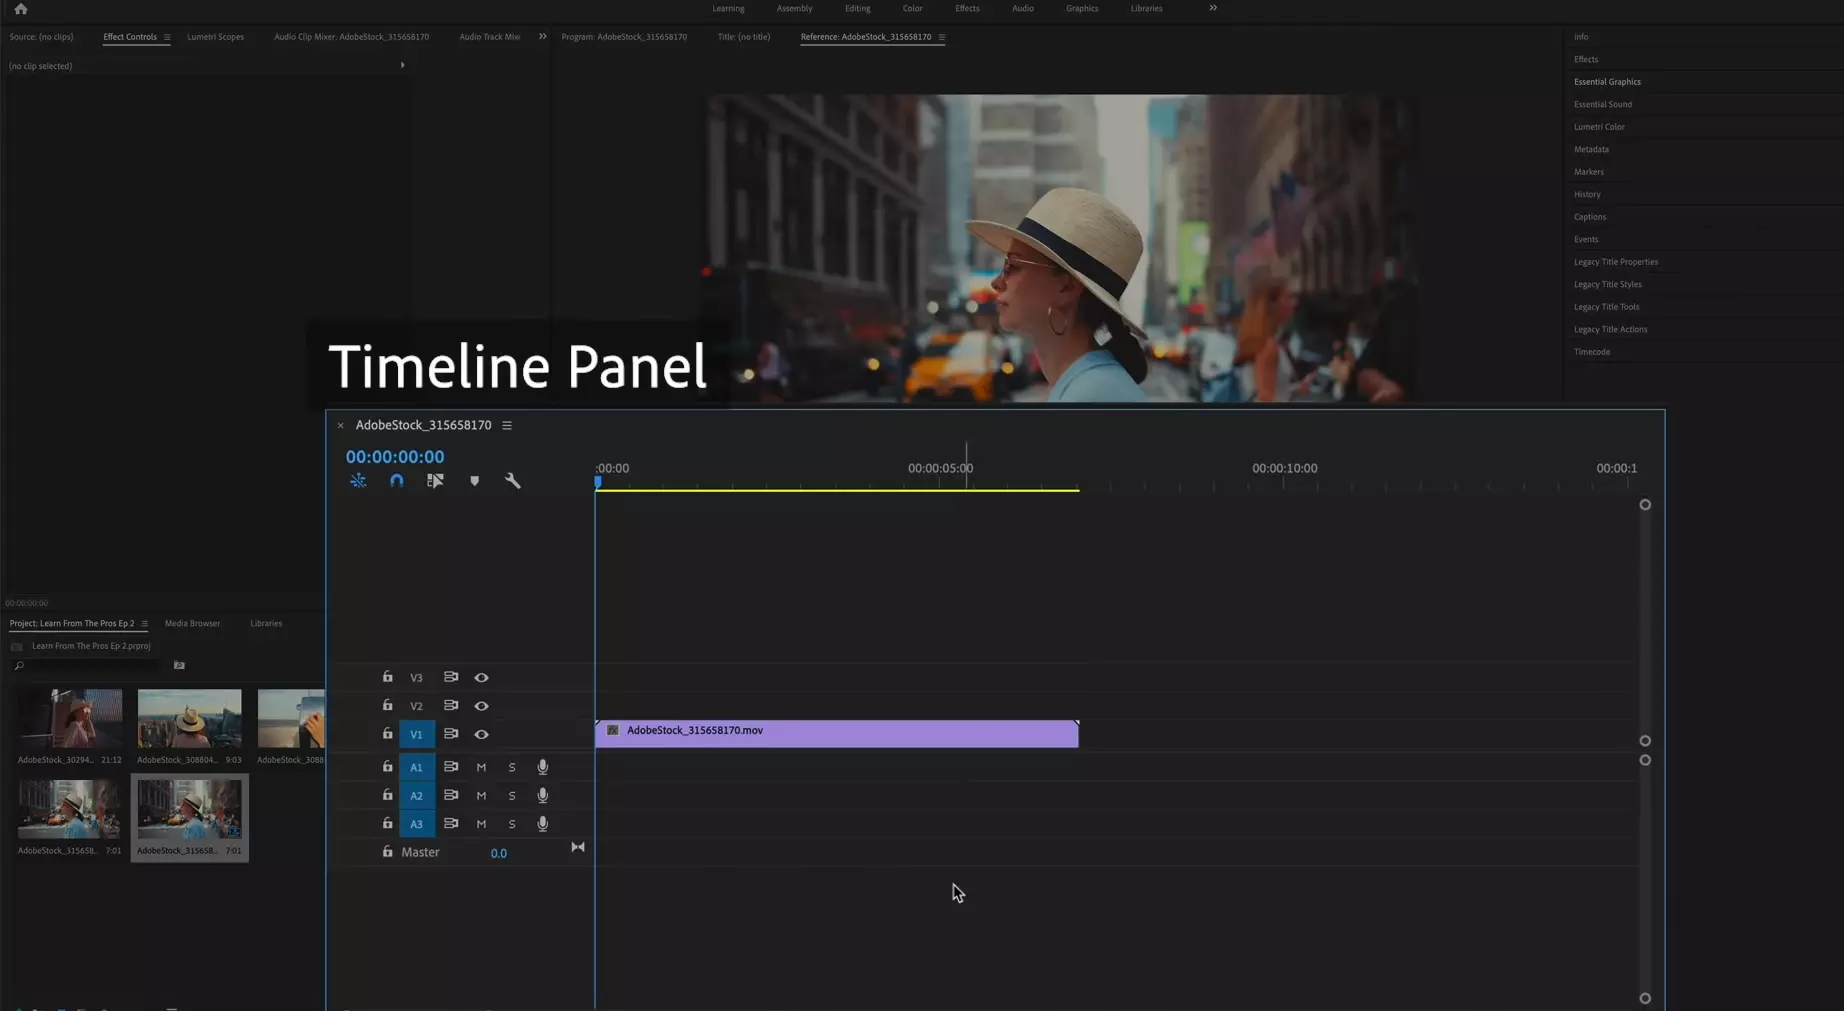
When you drag and drop a media file from your Project Media Panel into your timeline panel, Adobe will create a new sequence for you to work on. As standard with any other timeline-based video editing software, you get a blue timeline you can move around to edit or watch different parts of your sequence. You can zoom in and out using the buttons you have on your timeline or use the (+) and (-) shortcuts to do the task faster.
Your timeline is separated into two parts. The upper section holds your audio files, while the below section contains your graphics, images, and videos. So if you have a video file with audio, for example, audio and video will show in a different section of the timeline.
Next up, the most useful feature of Adobe timeline is the ability to work with layers. You can add media files on top of each other if you wish to blend and create different unique effects.
Program Monitor
Program monitor shows us what we are looking at in the timeline, and it can be found on the middle-upper section of your Premiere Pro layout. However, a program monitor is much more than a simple playback screen. You could drag and drop your clips from your media panel directly to the program monitor instead of timeline to the program monitor to insert, insert before & after, replace, overlay, and overwrite a media clip. These are called dropzones and can be seen in the following image. It's a useful feature when dealing with hundreds of clips in your timeline.
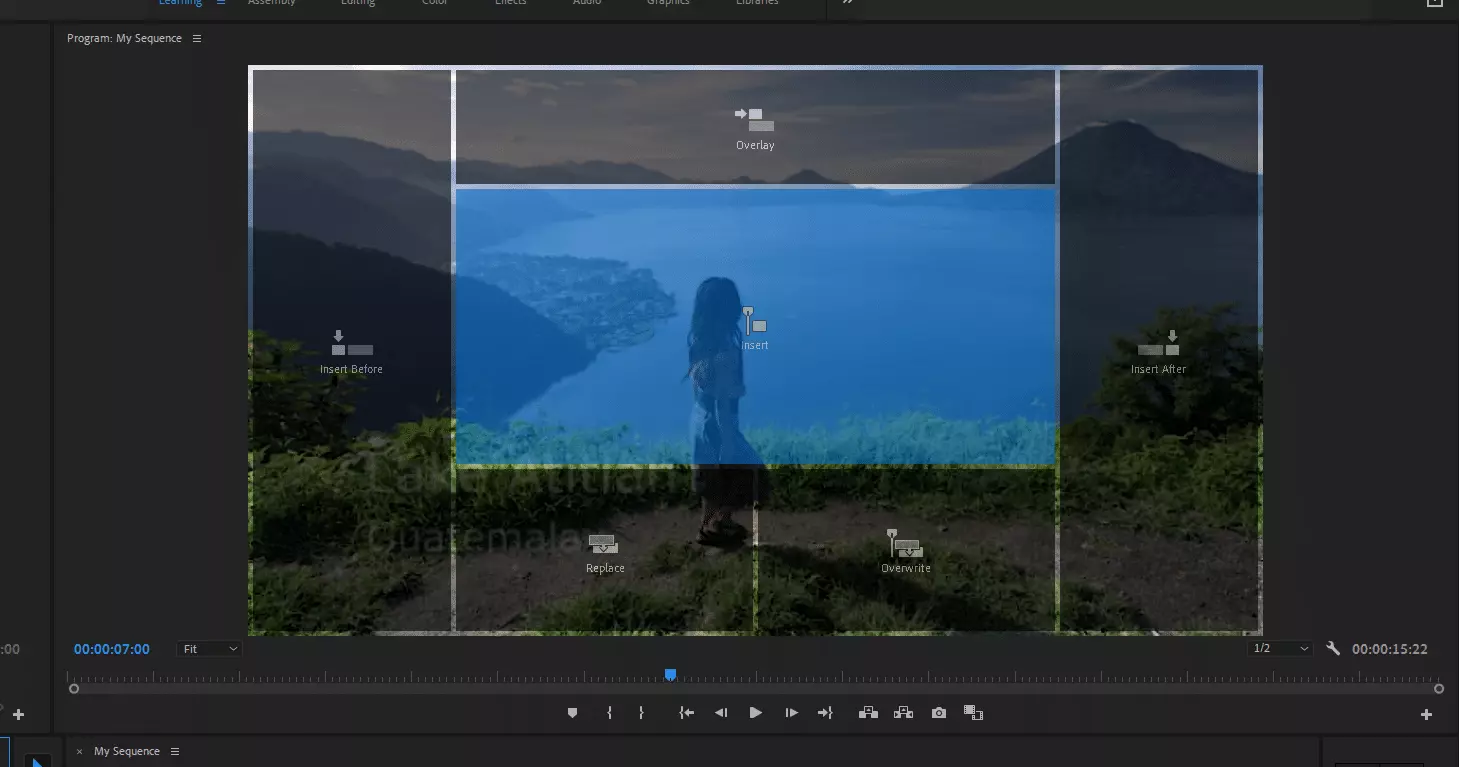
Your program monitor menu also contains shortcut menu buttons, including marker, marker in, marker out, moving frame by frame, lift, extract, export frame, and comparison view.
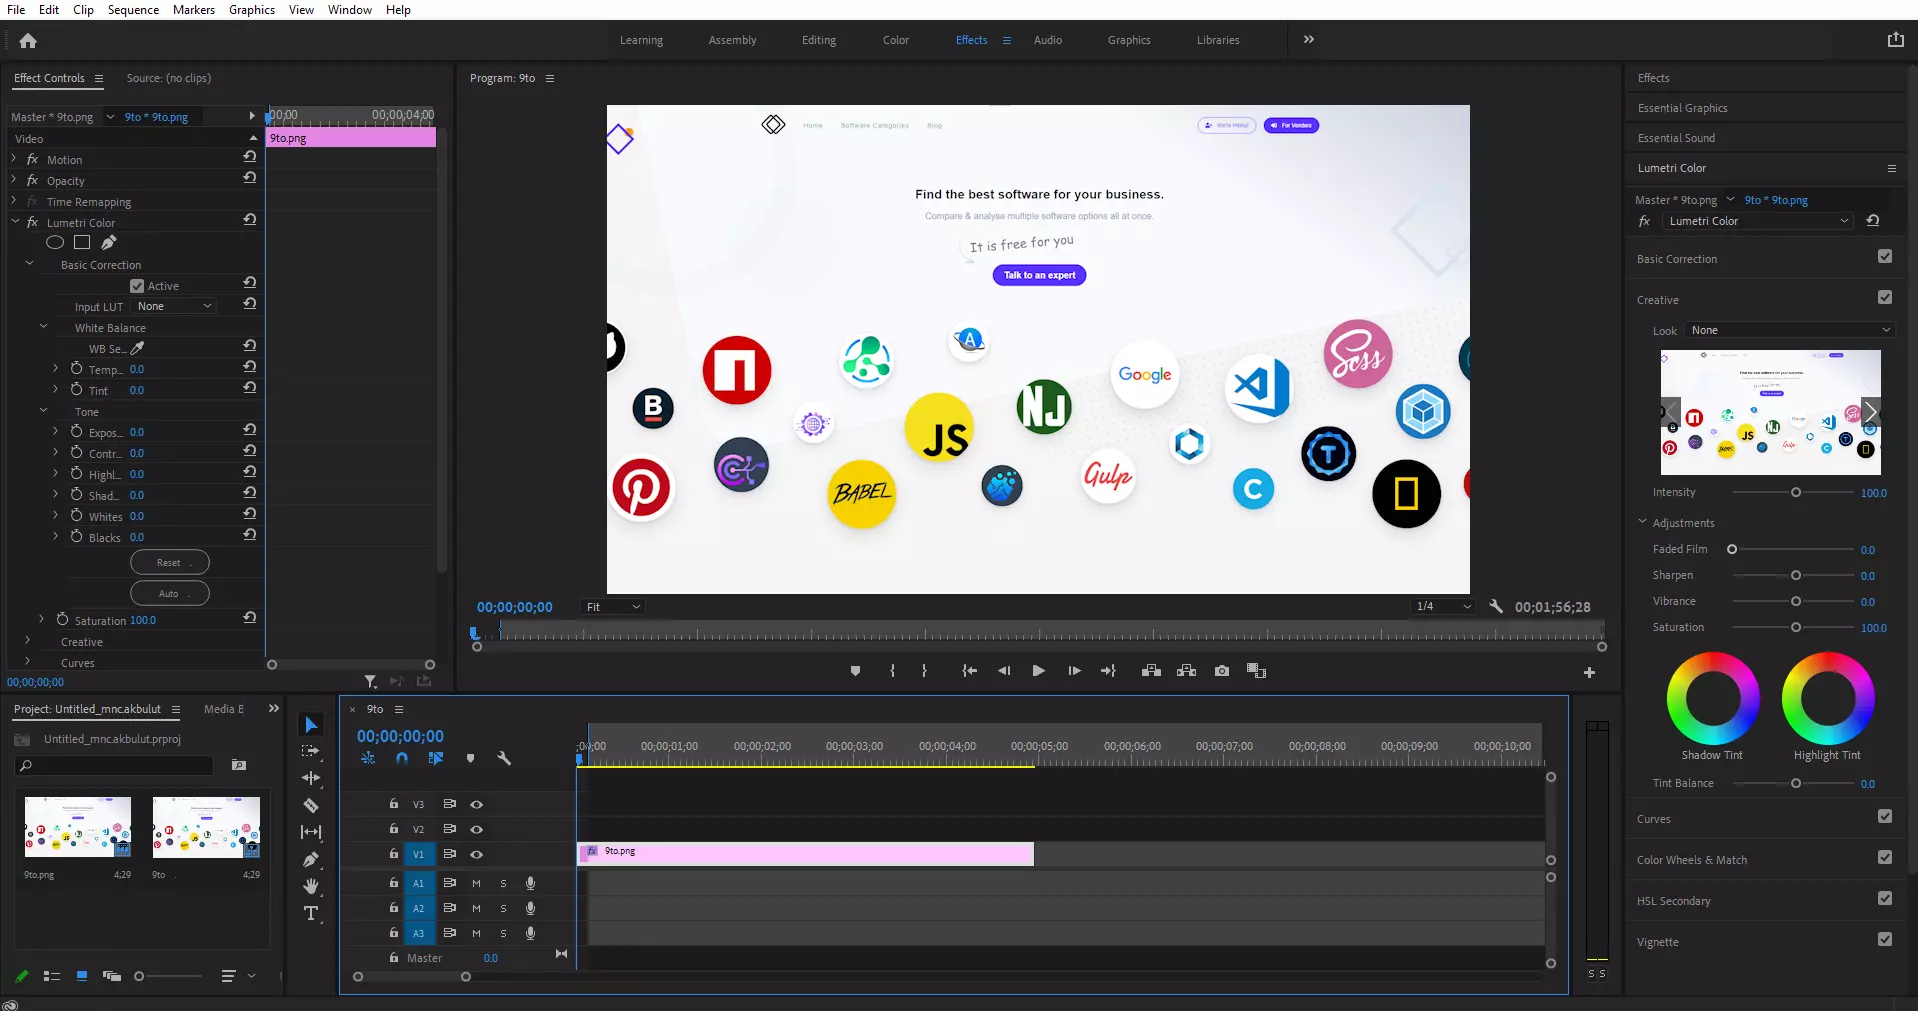
Effect controls panel
If you're using the default Premiere Pro layout, your effects control panel can be found on your screen's left top side. If it's not there however, go to Window. From the dropdown menu, select Effect Control to add it to your workspace.
Effect controls panel gives you options to adjust position, scale, rotation, anchor point, anti-flicker filter. It's also possible to add opacity, apply time remapping, speed, lumetri colors, and more using your Effect Controls panel.
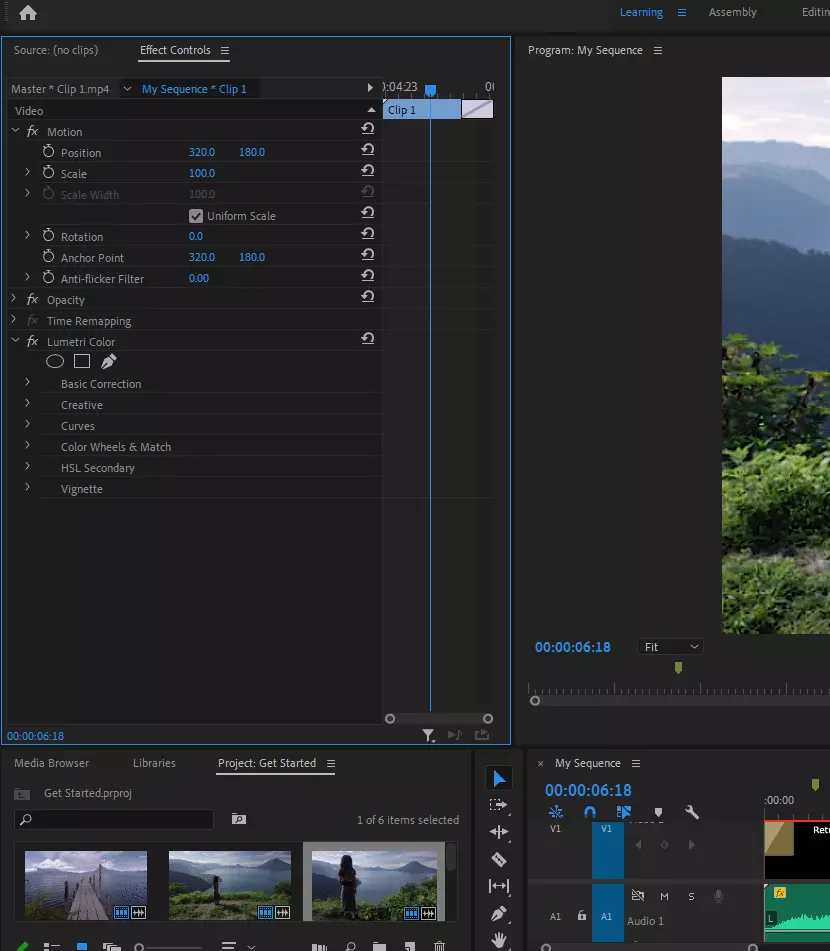
The position option under the 'Motion' menu lets you adjust the position of your clip on the main screen, for example, or you can even type in specific dimensions of your clip to be on.
Source Monitor
Source monitor helps you prepare your clips and media files for editing and can be found in the left top section of your screen if your layout is set to 'Editing'.
Lumetri Scopes
It is a helper tool found in Premiere Pro to help you evaluate and color correct your clips. If it's not visible within your panel, activate it from your Window menu. Lumetri Scopes include Vectorscopes, Histogram, Parade, and Waveform.
Info Panel
The info panel is in the left top section of your screen. It displays all the information relevant to your projects and clips, including its name, type, audio Herz, compression information, start & end time, duration and much more.
Effects Panel
Effects Panel in Premiere Pro is responsible for listing all the effects used in the active video clip & image and their properties. If you've accidentally removed your effects panel or never had it, to begin with, it's very easy to have it back. Retrieving a panel, regardless of its type, is simple. Whenever you miss a panel, go to Windows, then select the panel you're missing from your Adobe Premiere Pro interface. In this case we are missing Effects Panel, so select that. It should appear in the left top section of your screen. To see the effects applies, make sure the click is selected on your timeline.
Essential Graphics Panel
Essential Graphics Panel, or EGP, isn't directly visible as the other UI elements and panels we have mentioned so far. To see and work with it you need to exit editing screen and go to "effects". When you do so, it should appear on the right section of the screen. Essentially, EGP contains all the free & paid presets that you can use in your videos, including titles, lower-thirds, credits and transitions. You can edit these right from your timeline.
EGP also offers a quick and easy way to install your own or downloaded presets.
Transitions and Effects
Adobe Premiere Pro has one of the largest transition effect libraries and lets novices and experts alike add transition effects in between clips easily. Just add 2 or more clips into your timeline, and drag & drop a transition preset of your choice between the clips. If you can't place the effect in the right place, it might be good to zoom in on the clip first so the transition will be easier to work with. One of the easiest ways to add a transition to your clips is by selecting your clip and applying the default transition. It'll add your default transition to all the available clips in the timeline. To delete a transition, simply select it and press delete key on your keyboard to eliminate it. If you wish to extend or cut the duration of a transition, simply drag the sides. If you wish to change the default transition, simply right click on a transition and set it as your default so you can later apply it to all your clips quickly. Effects control panel gives you ability to change most features of your transitions, including their duration and direction, by selecting one of the directional arrows in the panel.
Premiere Pro Won't Let Me Add Transition
There might be 2 things wrong with your clips if you can't add transition effects. First, check if the clip is long enough to add the transition you want. Premiere needs a little extra bit of your footage to make the transition work smoothly, and if it's not nearly long enough, it'll give you an error. Also, make sure you aren't trying to add the transition between audio clips. It's a common mistake video editors make when their timeline gets a bit crowded.
360 VR Video Editing with Adobe Premiere Pro
Adobe includes some of the most powerful 3D video editing tools with the Premiere Pro CC 2021. It also happens to be one of the easiest applications to work with for 360 VR video editing.
Adobe became an industry leader in immersive effects, in other words, 360 VR video editing and virtual reality, after acquiring Canada based 360 VR company that specializes in making effects and transitions for 360 videos specifically back in 2017. In the past, you had to purchase these plugins separately to be able to do anything related to VR content in Adobe Premiere Pro. Nowadays, after the acquisition, it has changed and all the effects & transitions Mettle offered are standard features within the Adobe ecosystem.
Collaborative Editing in Adobe Premiere Pro
Adobe has changed the game entirely by being the first editing tool that allowed editors to collaborate with other editors & coworkers on their workflow.
There are a few ways Adobe lets you collaborate with other team members.
Adobe Team Projects
Your first option is to use Adobe Team Projects. Team projects let you work with other people on the same project remotely. It's great when editors working on a clip aren't within the same room. How it achieves it is simple, using built-in version controls, quite similar to GitHub. Whenever you or any other person on the project changes on the clip, it displays the change to other team project members.
Unfortunately, the process gets quite cumbersome as the project grows and packs more and more data. There are also a lot of fail points. For example, it won't work if you and other people on the project have different media paths.
It still is the best way to collaborate on Adobe Premiere Pro projects when the project members arent located in the same physical location.
Adobe Shared Projects
A second, more intuitive and streamlined way to collaborate is using Shared Projects, which are like shared folders among team members that update instantly.
Shared projects are local collaborations, and they require you to have some sort of shared storage like a Luma Forge jellyfish. Some of the major benefits of working with shared projects are that any time that you or someone else on your team add a new media clip to your jellyfish, it's instantly available to everybody.
If you add a clip to a shared project, all your other team members have to do in order to see the changes is to hit the refresh button.
There are some tips and best practices for creating the most productive shared projects, the most important one is to have a master project.
Your master project acts like the main project everyone on your team has open simultaneously. Shared projects also copy their settings from the master project. So whatever settings you set in that master project is what settings your shared projects will use.
You'll see an icon on the bottom left side of your screen while working on shared projects. If the icon is red, it tells you that you're in read-only mode, which means you can't edit or make any changes to that particular project. However, you can still set in and out points and edit the clips from that project into a sequence that you have control over.
If the icon is green, you can view and edit the project without any limitations. You can make any changes you want and save them by locking the project. If you want to know who has control of a specific shared project, just look in the Project Lock column, and you can find out the team members actively working on the project and any changes they have made.
Auto Reframe for Social Media
One of Adobe's 2023 update's most desired features is Auto Reframing.
It does exactly what it says. Auto Reframing reframes clips for Instagram, TikTok, Snapchat and others using Adobe Sensei Machine Learning Technology and AI to automatically detect the most important part of your clip and where the action is happening. Then reframes your clip in vertical or square, depending on the platform you're going to upload to.
Auto Reframing saves social media marketers lots of time and headache by dynamically adjusting aspect ratios such as square vertical or 16x9 video.
How do I Auto reframe in Premiere Pro?
Simply drag and drop the Auto Reframe effect on the clip you'd like to reframe and Premiere Pro will take your media, analyse it using its magic formula, and reframe it to your preferred aspect ratio keeping the most important content in the frame.
Sometimes what Adobe thinks is the most important part of the clip could be different than what you consider it is. If that's the case, you can tell the algorithm how much movement to expect from the video, and it'll adjust the result accordingly to fit the most important part inside. Motion key frames are generated that follow the action in your video content, if needed, you can edit the key frames so that you always have control over the final result.
Output and Performance
There are many factors that influence Adobe Premiere Pro's output and performance. These include hardware (the biggest factor), software version, video resolution, frame rate, length of the sequence/clip being edited, effects applied to clips in a sequence, preview settings used when editing a sequence or clip (rendering), size of cache files used by Adobe Premiere Pro (cache files control Premiere Pro's use of available RAM), preferences settings used (RAM previews), operating system(s) you're working on including their versions and settings.
Check our Premiere Pro cache guide to see how easy it is to manage your caches in Premiere Pro.
Premiere's Export option offers most formats you'd ever want, and for more output options there is the Adobe Encoder. The encoder can target Facebook, Twitter or Vimeo to name just some of its many uses, including batch encoding that will make all your videos work well on mobile phones as well HDTVs (high definition TVs).
The adobe encoder is a standalone application that allows you to encode and transcode adobe premiere pro projects.
The new Quick Export feature is the answer to all your export needs! You can quickly export a project in one of seven different formats using presets:
- Match Source: Adaptive High Bitrate
- Match Source: Adaptive Medium Bitrate
- Match Source: Adaptive Low Bitrate
- High Quality 2160p 4K
- High Quality 1080p HD
- High Quality 720p HD
- High Quality 480p SD
64-bit CPUs and multiple cores allow Premiere Pro to take advantage of more than one processor and it is the perfect editing software for those who want to take advantage of their computer's horsepower. We have tested PP on two different computers: one running 64-bit Windows 10 and another with a relatively older macOS Sierra 3 1/2 GHz Intel Core i5 processor, 8GB RAM and Nvidia GeForce GTX 950m graphics card.
It beat Wondershare's Filmora, Vegas PRO 19, VSDC and Magix by rendering my 4K video clip within the shortest time.
Adobe Premiere Pro Alternatives?
Adobe Premiere Pro is one of the best video editing software in the market. It has great features, and it can be used by professionals, amateurs or even beginners. Although Adobe Premiere Pro is a good program, there are other alternatives you can use to edit videos too. In this blog post I will show you five top video editing programs that are worth checking out if you're interested in switching from Adobe Premiere Pro to another software for your projects!
Since this topic is already covered greatly in our other articles and videos, we'll just link them instead.
Questions & Answers
Can I download Adobe Premiere Pro for free?
Adobe Premiere Pro is a paid, subscription-based software with monthly or annual payments. You could, however, get a 30 days trial to test the software without any commitments.
Is Adobe Premiere Pro good for beginners?
Although Adobe Premiere Pro is one of the most powerful desktop-based software editors, thanks to its intuitive design and plethora of online tutorials. No matter what type of problem you might face or questions you may have, you can count on hundreds of thousands of people who faced the same issues and posted the solution online. It's just one of the perks of being the most used video editor out there. So the short answer is yes, it is one of the best video editors for beginners.
Is Premiere Pro worth the money?
We can't think of any other arsenal of software that lets you create anything digital for only $20,99 a month. For the price, you have access to all of the Adobe apps that help you make professional videos, record voiceovers, create 3D animations, and more! If you're a student, non-profit organization or a teacher, you could also enjoy an additional discount. For the value you're getting, it's practically a steal.
How Much Does Adobe Premiere Pro Cost in 2023?
Adobe Premiere Pro starts at $20.99 per month, billed annually. It's one of the priciest when compared to its competitors and alternatives. However, the value you get with the Adobe Creative Cloud is unmatched. The subscription gives you unlimited access to all of Adobe Premiere Pro CC features and future updates and 100GB of cloud storage.