There may be sound problems or delays in a video for some reason. You can notice it when you're editing or exporting the video. I will show you the easiest way to solve this problem and sync the audio and video in this tutorial.

1. Merging

Open your project panel and select the video clip and the audio you want to sync together. Then, right-click on the clips and select "Merge Clips." make sure that you click the circle next to the audio, then click okay. It will help you form a new merged clip in your project panel. Then you can open your video in your source panel, right-click on the merged clip, select a new sequence from the clip, and keep editing.
2. Synchronize
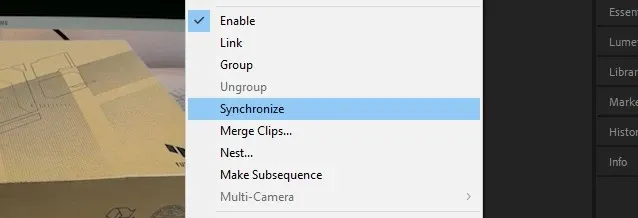
Drag your clip and the video to a new sequence and make them compatible to start synchronizing. Highlight all the clips, right-click and click on synchronize option. After doing that, you'll notice that they are synchronized.
3. Manual Synchronization
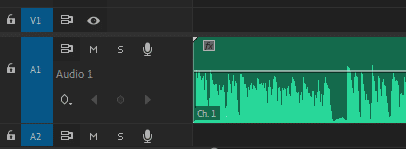
This Synchronization uses the waveforms in the timeline. Zoom in on the timeline and expand the audio layers to see the audio waveforms. You may not have clicked on the 'show audio waveforms' option if you can't see it. To activate it, click on the wrench icon and check that if show audio waveform option is selected. Now you can compare the shapes of the waveforms if they are similar. You can move the USB condenser over to align it with the waveform of the on-camera sound.
How do I fix audio lag in Premiere Pro?
You may have an audio lag problem when you're playing a clip. There may be a problem when people talk, or the clip may restart from the beginning. Click on your video and go to the properties, and you can see the variable frame rate detected here. That's the reason why your Premiere pro is lagging. To fix this problem, you can download the program called Handbrake. Open this program and drag the video which has an audio lag; this program will be beneficial for you to fix it. After the arrangement, you can open the video on Premiere Pro and see the difference. Check out the following tutorial to learn more about ways to fix your lag issues in your Premiere Pro
How to manually sync audio and video in Premiere?
You can also sync your audio manually if Premiere Pro doesn't fully sync your audio and video or if you're having any issues with how to sync automatically.
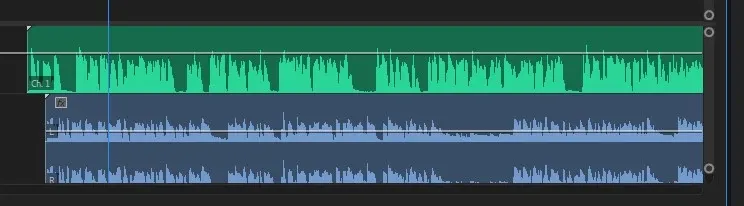
First, place the original video and the audio you want to sync in your timeline for manual syncing. For audio channels, drag the slider on the right side of the timeline to expand the internal and external audio of the video file.
That way, you can see the ups and downs of the sound. Look for similarities between the sound and rank them to match. After doing this, you can replay the video to see if the audio matches the way you want. If the new layout is what you want, you can delete the internal audio; the new audio will be the only one playing.
Audio out of sync After Export in Premiere Pro
Premiere Pro can playback most kinds of H.264 footage when exported to H.264 or HEVC at 4K or 8K quality; some computers may have some problems because they might not be powerful to play them. To play the file without having any issues, you should export a smaller file, for instance, an HD quality. If the resulting HD H.264 file plays back, your hardware might not be powerful enough to play the 4K system. Another reason I experienced out-of-sync audio and video was after using the ducking feature in Premiere Pro. There's a known bug in Premiere Pro 2023 that results in out-of-sync audio after you render the ducked audio clips, and it still hasn't been fixed yet.