YouTube automatically adds CC, also known as Closed Captions, to your videos, but what if you want them embedded inside your video for a better style or to publish on another platform?
That’s where Premiere pro subtitles and captions come in. You can manually or automatically generate captions without paying extra for transcription services. If you’ve already paid for Adobe Cloud, they won’t charge you extra. Since the feature was introduced in the latest version of the software, make sure you download an up-to-date version from the following link below.

How to add captions and subtitles in Premiere Pro
- Launch Premiere Pro and insert your audio clip.
- Switch to the Captions and Graphics panel and select Text -> Captions

- You’ll have 3 options to choose from. Transcribe Sequence, Create new caption track, and Import captions from the file.
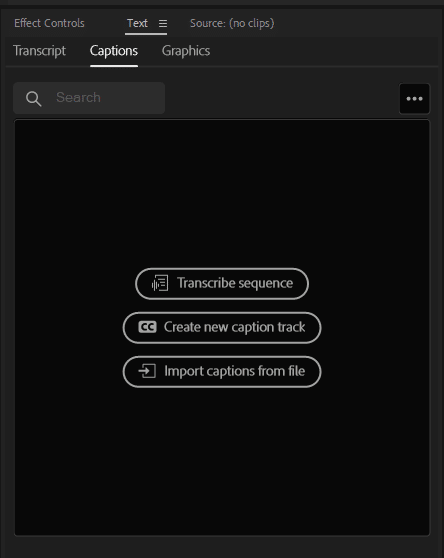
- Transcribe sequence is the option we’ll choose since it automatically creates transcription of the speech, while others require you to transcribe them manually and install them as a file.
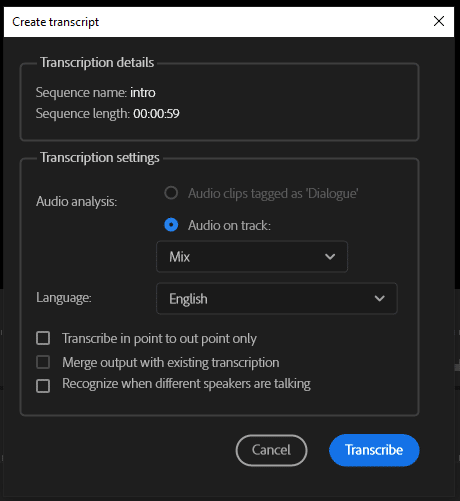
Once you click on Transcribe Sequence, settings pop up will appear, giving you a few options. You could select only audio clips you tagged as Dialogue. We showed you how to do that in our volume adjusting tutorial or just the audio on selected tracks. You could also select transcription language. By default, English, US is selected, but you can change it to UK English and additionally install other languages such as Chinese, Spanish, Korean, German, French, and many others.
Transcribe in point to outpoint only option lets you transcribe only the selected bit of an audio clip. You can also recognize different speakers. If you select that option Premiere, Pro will recognize different people speaking and give each speaker a different styling, so it’s easier for viewers to figure out who’s talking.
- When you are ready, click on Transcribe.
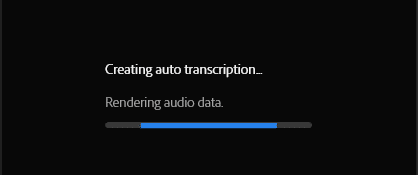
This process might take some time depending on the length of your audio, and it requires an internet connection. Because the transcription process is done on Adobe Cloud servers.
When completed, you’ll see the following screen. No matter how advanced, no AI can create perfect captions. So there might be errors and typos here and there. You can quickly go over and fix them by double-clicking on the word.
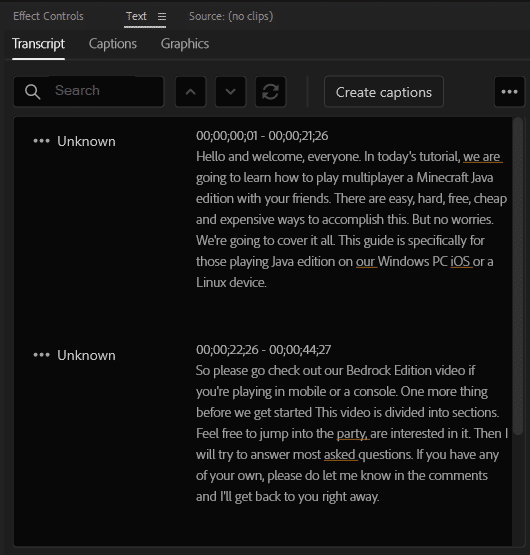
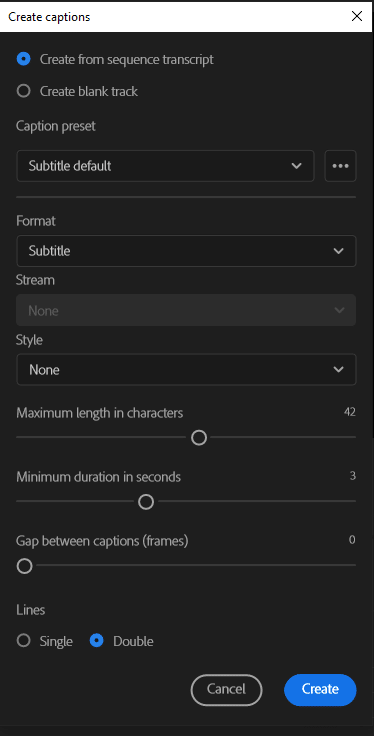
When finished fixing typos in your subtitles, click create captions and Premiere Pro will let you adjust a few more styling settings.
You can change the text format, apply style from saved layouts, set character length, and pick single or double line captions. We mostly prefer a single line as it takes less space on the screen. When you are happy, click on Create button, and your subtitles will be applied to your video.
How to move captions in Premiere Pro
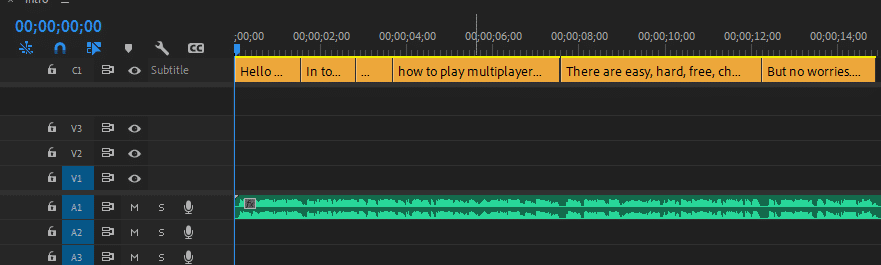
Once you’ve created your captions, they will look like this in your timeline and have their own track.

We’ve never had issues with misplaced captions that don’t match with the video, but if you must move and adjust their timing, you can grab them by the edges, change their length and drag on the timeline just like a clip.
How to create a VTT file in Premiere Pro
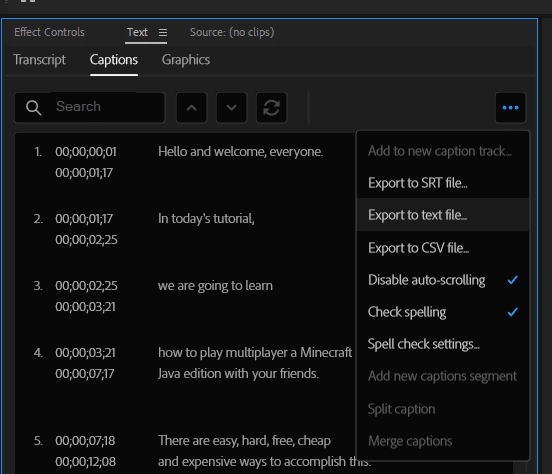
Premiere Pro, unfortunately, doesn’t support VTT files by default. But you can save them as an SRT, text, and CSV file by clicking on triple dots on your settings.
Once you save it as an SRT file, HappyScribe converts your SRT file to WebVTT (VTT). The process takes a second and better alternative to install Premiere Pro extensions to export VTT.
Questions you might be asking?
What is the purpose of adding captions and subtitles to videos in Premiere Pro?
Adding captions and subtitles to videos in Premiere Pro can enhance the viewing experience for individuals who are deaf or hard of hearing, as well as those who prefer to watch videos with captions. It also allows for better accessibility on various platforms and can improve video engagement by reaching a wider audience.
Can I generate captions automatically without extra cost in Premiere Pro?
Yes, if you have already paid for Adobe Cloud, you can generate captions automatically in Premiere Pro without incurring any additional transcription service charges. This feature is available in the latest version of the software, so make sure you have downloaded and installed the up-to-date version.
How can I add captions and subtitles to my video in Premiere Pro?
To add captions and subtitles to your video in Premiere Pro, follow these steps:
- Launch Premiere Pro and insert your audio clip.
- Switch to the Captions and Graphics panel and select Text -> Captions.
- Choose the option "Transcribe Sequence" to automatically create a transcription of the speech in the audio clip.
- Customize your settings, such as selecting the audio clips tagged as Dialogue, choosing the transcription language, and recognizing different speakers.
Q: Can I move and adjust the timing of captions in Premiere Pro?
A: Yes, if you need to move and adjust the timing of captions in Premiere Pro, you can do so by selecting the captions in the timeline and dragging them to the desired position, just like moving a clip. This allows you to synchronize the captions with the corresponding segments of the video.
Can I export captions as VTT files directly from Premiere Pro?
Unfortunately, Premiere Pro does not support VTT files by default. However, you can save the captions as SRT, text, or CSV files within Premiere Pro by clicking on the triple dots in the settings. Alternatively, you can use third-party tools or Premiere Pro extensions to convert the SRT file to a VTT file for compatibility with specific platforms or requirements.
Do you have any other tutorials or guides available to help with video editing in Premiere Pro?
Yes, we publish numerous guides and tutorials every week to assist with various aspects of video editing in Premiere Pro. If you have a specific problem or topic you would like to learn more about, please let us know in the comments, and we will endeavor to provide helpful assistance. Happy editing!
Did this tutorial help you with what you were looking for? We publish dozens of guides like this every week. If you have a problem you are looking to solve, let us know in the comments, and we’ll see if we can help you.
Happy editing!