In this tutorial, you will learn how to apply soft-edge masks to your videos in Premiere Pro to protect a person’s identity and track the mask in a scene for continuous blur tracking.
Also read: How to fix blurry video in Premiere Pro?

Why would I blur something in Premiere Pro?
Use cases for blurring an object in Adobe PP are unlimited. You may have to blur a face that you don’t have permission to use, and you may be blurring adult content in your media so you can upload it to social media without facing any issues. Or you could be simply blurring copyrighted material on your footage such as logos and brand names.
How to apply the blur effect on Premiere Pro?
To blur a moving or stationary object, first, you’ll need to mask the area. This way, you could not only blur but also apply a cover, highlighting effects. The shape and form of the mask you’re going to apply will depend on the size of the area you’re going to blur. You could draw a custom shape, a rectangle, a square, or even an ellipse.
Also read: How to add film grain to video?
So without further ado, let’s get started with the actual steps involved in blurring an object:
1. Import your media
As with anything you’ll do on Premiere Pro, first import your footage that includes the area you’d like to blur out.
2. Apply the blurring effect
The next thing you’re going to want to do is go to the effects. It should be located in the right panel if you’re using the standard workspace layout. Find “Video Effects” in the menu. Underneath, you’ll find the “Blur & Sharpen” dropdown menu.
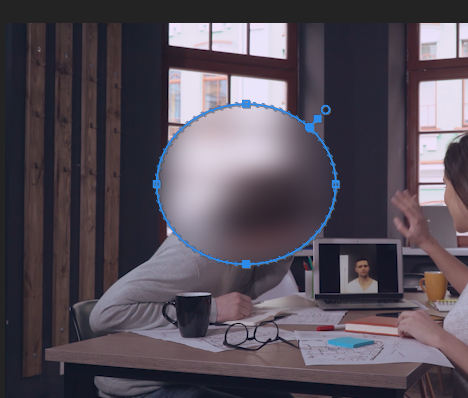
Click on “Camera Blur” and drag & drop it to the media file you want to blur on your timeline. The entire clip will end up blurred.
This defeats the entire blurring purpose, so let’s continue with step 3:
3. Specify the area that needs to be blurred

Unless, for some reason, you want the entire video to be blurred, it’s a good idea to go to the effects settings and give the blur a shape, strength, and form.
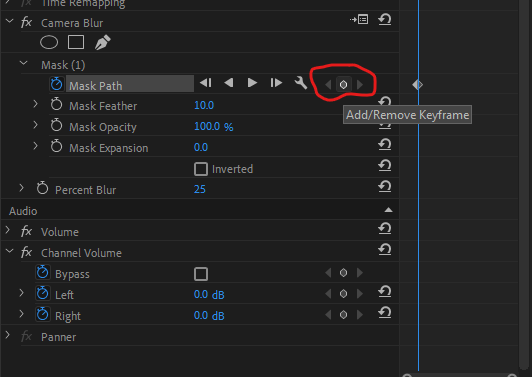
Go you your editing workspace, and inside the “Effects Controls” tab, you’ll see Camera blur settings under the Video dropdown menu. That’s where you’ll change the shape of your blur.
Your options are an ellipse mask, 4 point polygon mask, and free draw bezier.
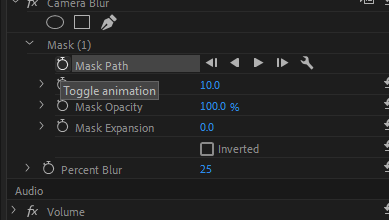
After deciding on the shape, you could set the options like mask path, mask feather for smooth borders, mask opacity, and mask expansion.
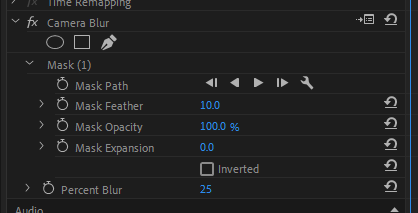
Once you’ve selected the shape, its size could also be manipulated by clicking and dragging the dots around the masked blur area.
How to blur a moving object in Premiere Pro?
Unless the object you want to blur is stationary, such as a logo at the corner of your video, you’ll likely be going to want the blurred area to move with the object blurred.
This easily could be accomplished using “Key Frames”. Here’s how you can make it possible.
- Move the timeline to where you want your mask to start moving, and then in mask settings, click on Toggle Animation. This will create your first keyframe.

2. Move your timeline marker further to decide how fast the masked area should change its position, and then bring the mask to where it should actually be blurring. And then click on Add/Remove Key Frame button.
Once you replay the video, you’ll notice the blur effect moves with the area that must be hidden. You could play around with the settings and keyframes to achieve even a smoother movement.
FAQ
Let's answer some of the most asked questions we get about blurring things in Premiere Pro
How do you blur someone's mouth in Premiere?
You can certainly blur someone's mouth in Premiere Pro. All you need to do is follow the steps we outlined in blurring a face. But this time instead of applying the mask on the whole face, just select the mouth area and increase the blur effect.
What is Gaussian Blur in Premiere Pro?
Gaussian Blur is a Premiere Pro plugin that can be used to create a variety of different blurring effects. It offers three different types of blurring: directional, horizontal, and vertical, as well as giving other options such as brightness, contrast, saturation, and hue of your blur effect. Each type of blurring has its own set of controls that can be used to fine-tune the effect. It can be found under Video Effects > Blur & Sharpen > Gaussian Blur tab. To use it, simply drag and drop it on your video clip.
How do you blur sides in Premiere?
The side blur effect is mainly used when you want to turn a vertical video into a horizontal one.
Step 1. Create a copy of your clip on your timeline
Step 2. Increase the size of your second clip and apply the blur effect on the horizontal video.
Step 3. Bring the original vertical footage to the front.
That was all for this tutorial, folks. Thank you so much for reading. If you think there’s something we missed or you know of a better way to apply blur on Premiere Pro, please let us know in the comments so we can share your insight with the entire world!