Rulers and guides are like guiding stars for designers and editors in Photoshop, helping to measure the size and position of elements on the canvas accurately. Adobe Photoshop's rulers are displayed on the top and the left side of the canvas, providing a visual reference to measure objects' size and position. Along with rulers, users can create guides that assist in object placement and alignment with ease. Guides and grids enhance the precision of alignment and layout design tasks.

What are rulers & guides in Photoshop?
Rulers on the canvas serve the essential function of measuring the size and aligning design elements. In Photoshop, the ruler origin is set to the top-left corner of the canvas, and it provides a default unit of measurement in pixels. However, one can switch to other units such as inches, centimeters, and millimeters by accessing the "Preferences" option available in the "Edit" menu and selecting the "Units & Rulers" tab.
You can easily toggle the ruler on and off by pressing "Ctrl+R" on Windows and "Command+R" on a Mac. Also, users can change the ruler's origin on the canvas by clicking and dragging the crosshair icon at the intersection of the rulers.
Guides, on the other hand, are a game-changer in terms of object placement and alignment. Users can effortlessly add a vertical or horizontal guide to the canvas and "snapping" elements to it for alignment by clicking and dragging from either the horizontal or vertical ruler. Moreover, moving or removing a guide is also easy. You can use the Move Tool to drag it, or drag it back to the ruler to delete it.
How to Show & Hide Guides in Photoshop: Step-by-Step Guide
Here's a detailed process on how to show and hide guides in Photoshop:
Step 1: Open Your Document in Photoshop
Start by launching Adobe Photoshop on your computer. Open the document where you want to add or hide guides by clicking "File" on the top menu, then select "Open."
Step 2: Adding Guides
To add guides, first, ensure that the rulers are visible. If they're not, you can enable them by going to "View" > "Rulers" or using the shortcut "Ctrl+R" on Windows or "Command+R" on Mac.
Once the rulers are visible, you can add guides. Click anywhere on the ruler, then drag onto your canvas to create a guide. Dragging from the top ruler creates a horizontal guide, while dragging from the left ruler creates a vertical guide.
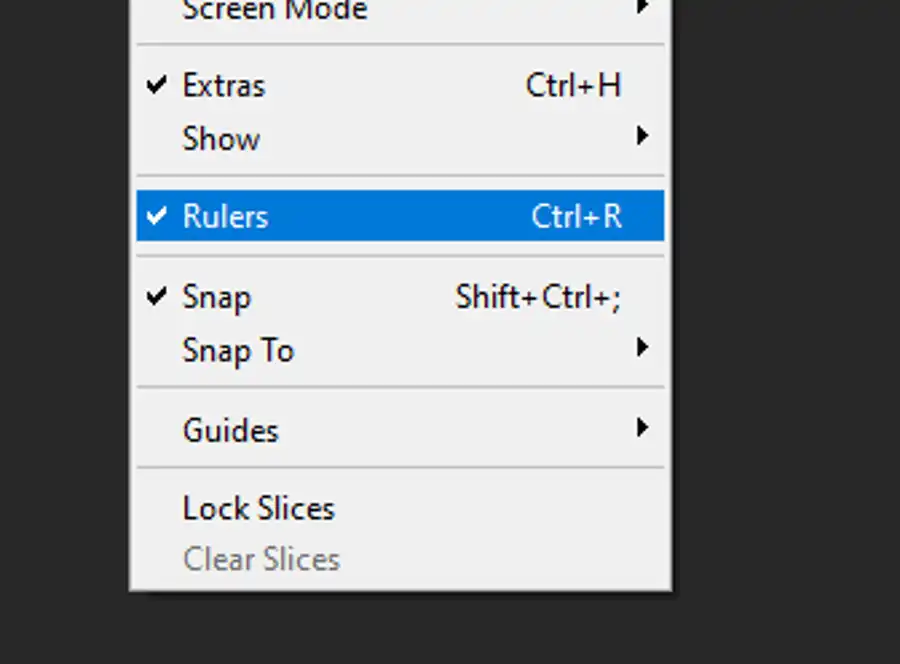
Step 3: Showing & Hiding Guides
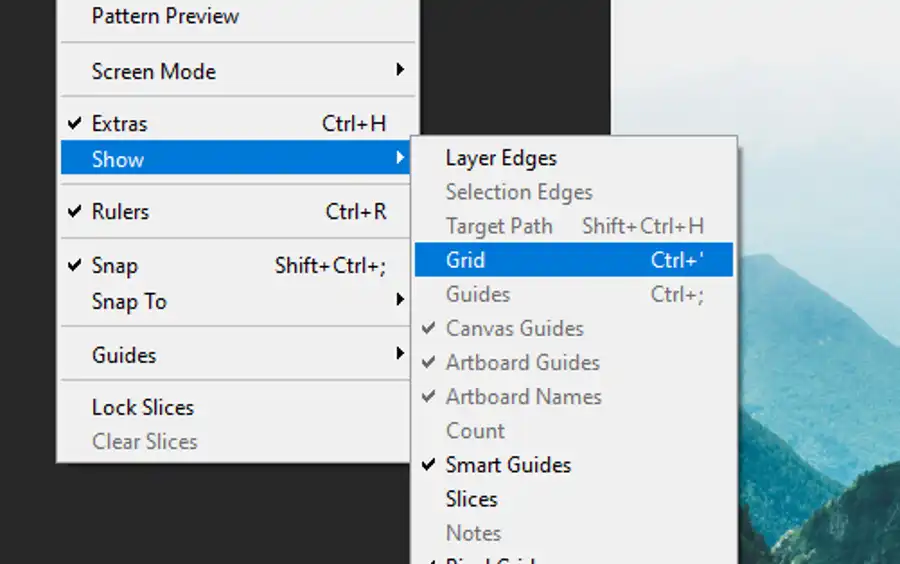
With your guides set up, you can show or hide them at any time. To do this, go to the "View" menu, then select "Show" > "Guides." A checkmark next to "Guides" means they are currently visible. Clicking on "Guides" will hide them, and the checkmark will disappear.
Alternatively, you can use the keyboard shortcut "Ctrl+;" on Windows or "Command+;" on Mac to quickly toggle the visibility of your guides.

Step 4: Clearing Guides
If you want to remove all guides from your canvas, go to the "View" menu, select "Clear Guides." This will remove all guides, giving you a clean canvas.
Step 5: Save Your Document
Lastly, don't forget to save your work. Go to "File" > "Save As," then choose your desired file format.
Conclusion
Guides in Photoshop are an essential tool for maintaining accurate alignment and positioning of your design elements. They can be easily shown or hidden as per your requirements, giving you flexibility and control over your workspace. Once you get the hang of it, using guides will become an integral part of your design workflow, helping you create well-structured and precise designs. Happy designing!
Questions you might be asking
How do I hide gridlines in Photoshop?
To hide gridlines in Photoshop, go to the View menu and deselect the Show-> Grid option. Alternatively, you can use the keyboard shortcut Ctrl + ' (Windows) or Cmd + ' (Mac) to toggle gridlines on and off.
How do you hide guides?
To hide guides in Photoshop, go to the View menu and deselect the Show-> Guides option. You can also use the keyboard shortcut Ctrl + ; (Windows) or Cmd + ; (Mac) to toggle guides on and off.
How do I hide guides in Photoshop 2023?
To hide guides in Photoshop 2023, the process is the same as in previous versions. Go to the View menu and deselect the Show-> Guides option. You can also use the keyboard shortcut Ctrl + ; (Windows) or Cmd + ; (Mac) to toggle guides on and off.
How do I turn off blue guides in Photoshop?
The blue guides in Photoshop are called Smart Guides. To turn them off, go to the View menu and deselect the Show-> Smart Guides option. Alternatively, you can use the keyboard shortcut Ctrl + U (Windows) or Cmd + U (Mac) to open the Preferences menu. From there, go to Guides, Grid, & Slices and uncheck the box next to Smart Guides to turn them off permanently.