Did you make a mistake? Do you feel that it doesn't look right? Don't stress! If you want to become more efficient with any video editing program, the best way is to learn how to use shortcuts, and Adobe Premiere Pro is not an exception.
Learning how to use shortcuts means you will perform your tasks fast. Did you know that you can customize Adobe Premiere Pro shortcuts as you please?

Follow these easy steps to undo any changes in Premiere Pro.
- If you want to undo the most recent change, select Edit > Undo. This will help you undo up to 35 recent changes you made to your clip.
- To undo all the changes that you made on the clip, select File > Revert.
- To undo all the changes you made since you opened the draft clip, go to the history panel and delete them from there.
- If you want to undo changes you made before the last time you saved the draft, open the previous version of the draft in the auto-save folder then select File > Save As. This will save in a different location and not the auto-save folder.
- You may also want to stop a change that Premiere Pro is processing in the background. Do this by pressing Esc.
What is the Shortcut for Undoing in Windows and Mac?
If you are using a Windows device, the shortcut for undoing is Ctrl+Z and if you are using Mac, press Cmd+Z.

History Panel
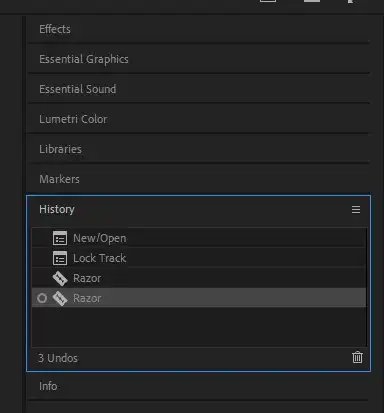
All the changes that you are making on your video clip are recorded in the history panel.
The command and the tool you used during the edits will appear in the history panel together with the identifying icon.
However, it will only record changes made during the current editing session. Moreover, it does not list individual changes in some panels and not program-wide changes such as preference settings.

This is because these changes are not in the draft video. Also, if you close and reopen a project you were working on, the previous changes will no longer be in the history panel.
The oldest edit you made will appear at the top of the list while the most recent will be at the bottom.
Here are some guidelines that will assist you to navigate the history panel of Adobe Premiere Pro.
- Select Window > History to launch the history panel.
- To select any change on the history panel, click it.
- If you want to delete any selected image, click it then click ok.
- Drag the scroll bar or slider on the panel to move around the history panel
- You can also choose Step Forward or Step Backward from the history panel menu to move around the panel.
- If you want to clear all the edits you have made, select clear history from the panel menu then click ok.
How To Redo in Premiere Pro?
If you want to redo any change you had undone, select Edit > Redo [name of change]
The redoing shortcut in windows is Ctrl+Shift+Z while in Mac it is Shift+Cmd+Z
Adobe Premiere Pro shortcuts assist you in mastering most of the interface functions in a short while. You will also be able to organize your projects and most importantly, work comfortably.