Adobe Audition, one of the premier audio editing tools, offers a myriad of options and features to optimize your audio editing and recording experience. One such useful feature is the ability to hear your voice while recording, also known as real-time monitoring. This process can enhance your recording experience, helping you catch and correct errors on-the-go and adjusting your tone or pitch as necessary. In this blog post, we will offer an in-depth guide on how to enable and use this feature in Adobe Audition.

Understanding Adobe Audition Workspace
Before we start with the step-by-step guide, it's important to familiarize yourself with Adobe Audition's workspace if you're new to the software. The workspace includes different panels such as the Files panel, the Effects Rack, the Editor panel, the Markers panel, and the Multitrack panel, each having its unique function and role in the audio recording and editing process.
Step 1: Setting up your Audio Hardware
The first step in the process is to correctly set up your audio hardware. This includes your microphone and headphones, which are crucial to the recording process. Here's how you do it:
- Launch Adobe Audition.
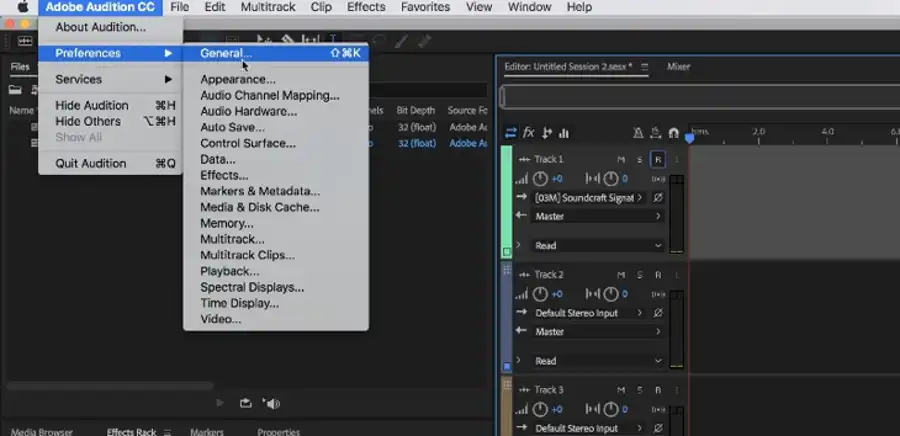
- Navigate to the 'Edit' menu on the top bar.
- Click on 'Preferences', then select 'Audio Hardware' from the drop-down menu.
- In the 'Audio Hardware' window, select your microphone in the 'Default Input' drop-down menu, and your headphones in the 'Default Output' drop-down menu.
- Click 'OK' to save your settings.
Step 2: Enabling Audio Input Monitoring
After setting up your audio hardware, you now need to enable 'Input Monitoring'. This feature allows you to hear your voice as you record in real-time. Here's how:
- Go to 'Window' in the top menu and select 'Multitrack View'.
- In the 'Multitrack View', click on the 'Input/Output' button (I/O) on the left side of the track where you're recording.
- From the drop-down list, select the microphone you want to use for recording under 'Mono' or 'Stereo'.
- Click on the 'R' button on the track to enable recording.
- Click on the 'I' button on the track to enable input monitoring. This will allow you to hear your voice through your headphones while you are recording.
Step 3: Adjusting Levels and Monitoring
Once you've enabled input monitoring, you're ready to start recording and monitoring your voice. However, before you hit the 'Record' button, you should adjust the levels to ensure optimal sound quality:
- On your track, locate the volume slider or 'fader'. This controls the loudness of your input signal.
- Speak into your microphone at your normal speaking volume, and adjust the fader so that your audio levels are averaging around -18dB to -12dB on the level meter. This ensures you have a good level without risking distortion from peaking over 0dB.
- Watch the level meter as you speak. If the levels are peaking in the red area, reduce the volume using the fader.
Step 4: Recording and Monitoring Your Voice
Now that everything is set up correctly, you're ready to start recording:
- Press the 'Record' button (or press 'Shift + Space') to start recording.
- As you record, you'll be able to hear your voice in your headphones. This real-time feedback allows you to adjust your tone, volume, and pronunciation as you go.
- When you're finished, click the 'Stop' button to stop the recording.
Step 5: Playback and Review
After recording, you should play back your recording to ensure everything sounds as expected:
- Position the playhead at the start of your recording.
- Click the 'Play' button or press the 'Spacebar' to listen to your recording.
- As you listen, make mental or written notes of any sections you might want to redo or edit.

Conclusion
Hearing your voice while recording can significantly improve the quality of your audio projects by allowing for real-time adjustments and improvements. Adobe Audition offers an easy way to enable this feature, thereby improving your overall recording experience. Like any other tool, remember that the key to becoming proficient in Adobe Audition is consistent practice and continual learning.
So, get your microphone ready, plug in your headphones, and start recording with confidence! Adobe Audition is a powerful ally in your audio editing journey, and mastering its features can help you produce professional-grade audio projects. Happy recording!
Questions you might be asking
How do you hear yourself while recording in Adobe Audition?
In order to hear yourself while recording in Adobe Audition, you need to make sure that your audio hardware is set up correctly. Go to the Edit menu, select Audio Hardware Setup and ensure that your input and output devices are correctly selected. Once you've done that, go to the Multitrack menu and select Preferences. Make sure that the option "Enable Live Input Monitoring" is checked. This will allow you to hear yourself in real time while you're recording.
How do you hear yourself on a mic in audition?
To hear yourself on a microphone in Adobe Audition, you need to follow the same steps as mentioned above. Make sure that your input and output devices are correctly selected in the Audio Hardware Setup menu. Then go to the Multitrack menu and select Preferences. Check the "Enable Live Input Monitoring" option. This will allow you to hear yourself on your microphone in real time.
Why can't I hear my recording on Adobe Audition?
If you're unable to hear your recording on Adobe Audition, there are a few things you can check. First, make sure that your playback settings are set correctly. Go to the Edit menu, select Audio Hardware Setup and ensure that the correct output device is selected. If that doesn't solve the issue, check that your tracks are not muted or that the volume is not turned down. You can also try resetting the audio engine by going to the Multitrack menu, selecting Playback Settings, and clicking on "Reset Preferences".
How do I get rid of background talking in Adobe Audition?
To get rid of background talking in Adobe Audition, use the noise reduction tools. First, select an area of your recording that contains just the background noise. Then go to the Effects menu and select Noise Reduction/Restoration. Choose the "Noise Reduction (process)" option and click on "Capture Noise Print". This will analyze the selected area and create a noise profile. Then, select the entire recording and go back to the Noise Reduction/Restoration menu. Choose the "Noise Reduction (process)" option again and adjust the settings until the background noise is reduced to your satisfaction.