Smart Objects are a useful feature in Adobe Photoshop that allows you to store different image content within a single, layer-like object. This article will cover everything you need to know about Smart Objects; from creating them, editing them, and even rasterizing them, we’ll explore the ins and outs of Smart Objects in detail.

What are Smart Objects?
Smart Objects allow for non-destructive editing, which means you can edit your image without altering the original file. They also allow for scaling without quality loss and make global edits easy. They can contain any number of Photoshop layers, including bitmap, type, shape, adjustment, and fill layers, Vector artwork created in Illustrator, and an imported image file, including JPEGs, TIFFs, Illustrator files, and even PSD files. As you can see, Smart Objects have their advantages, but there are some drawbacks to consider as well.

Benefits of Smart Objects for Photographers
One of the biggest benefits of using a Smart Object in a photographer’s workflow is non-destructive editing. Non-destructive editing allows for edits to be made without permanently changing the original file or image content, which is particularly helpful in case you need to revert to the original file. In addition to this, Smart Objects allow for scaling of images without losing image quality. By using Smart Objects to scale images, you can achieve high quality and resolution; this is particularly useful when you need to produce large images for printing or billboard advertisements.
Smart Filters are another benefit of using Smart Objects in Photoshop. Smart Filters are filter layers that can be applied to Smart Objects, allowing for non-destructive edits. The filters can be edited or removed at any time without damaging the original file content.
Drawbacks of Smart Objects
Although Smart Objects have many benefits, there are some downsides that you should be aware of. One of the biggest drawbacks of Smart Objects is that they slow down file processing times in Photoshop. With large files, this can mean that the software may become slow and unresponsive when working with a large number of Smart Objects. Another downside to Smart Objects is that they require a lot of hard drive space. Though they are beneficial to the workflow, be sure your computer meets the minimum requirements to support Smart Objects.

Creating Smart Objects
- Click on any Photoshop layer in the Layers panel.
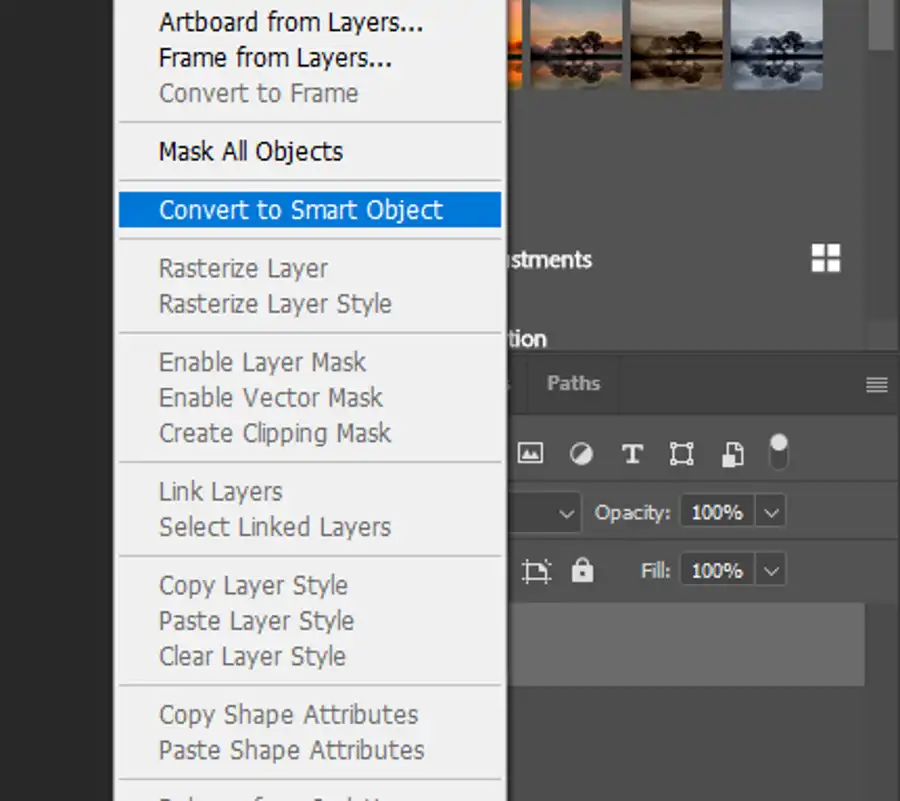
- Right click the Layer panel and select Convert to Smart Object.
- Alternatively, go to Layer > Smart Objects > Convert to Smart Object.
Editing Smart Objects
Editing Smart Objects is simple, and Photoshop lets you edit its contents as if they were a separate document. To edit a Smart Object:
- Double click the Smart Object layer in the layers panel. This will open the layer or image inside the smart object that you can modify in any way like it was a separate document.
- Make the required changes and save the Smart Object changes file.
- Photoshop will automatically update the Smart Object from the file you saved.
Duplicating Smart Objects
You can duplicate a Smart Object just like a regular layer. To do this:
- Select the Smart Object layer in the Layers panel and right-click.
- Choose Duplicate Layer or Duplicate Smart Object.
Converting Smart Objects to Regular Layers
There may be times when you want to convert a Smart Object to a regular layer. This is useful when you want to make a permanent change to a file. Conversion to a regular layer can be done as follows:
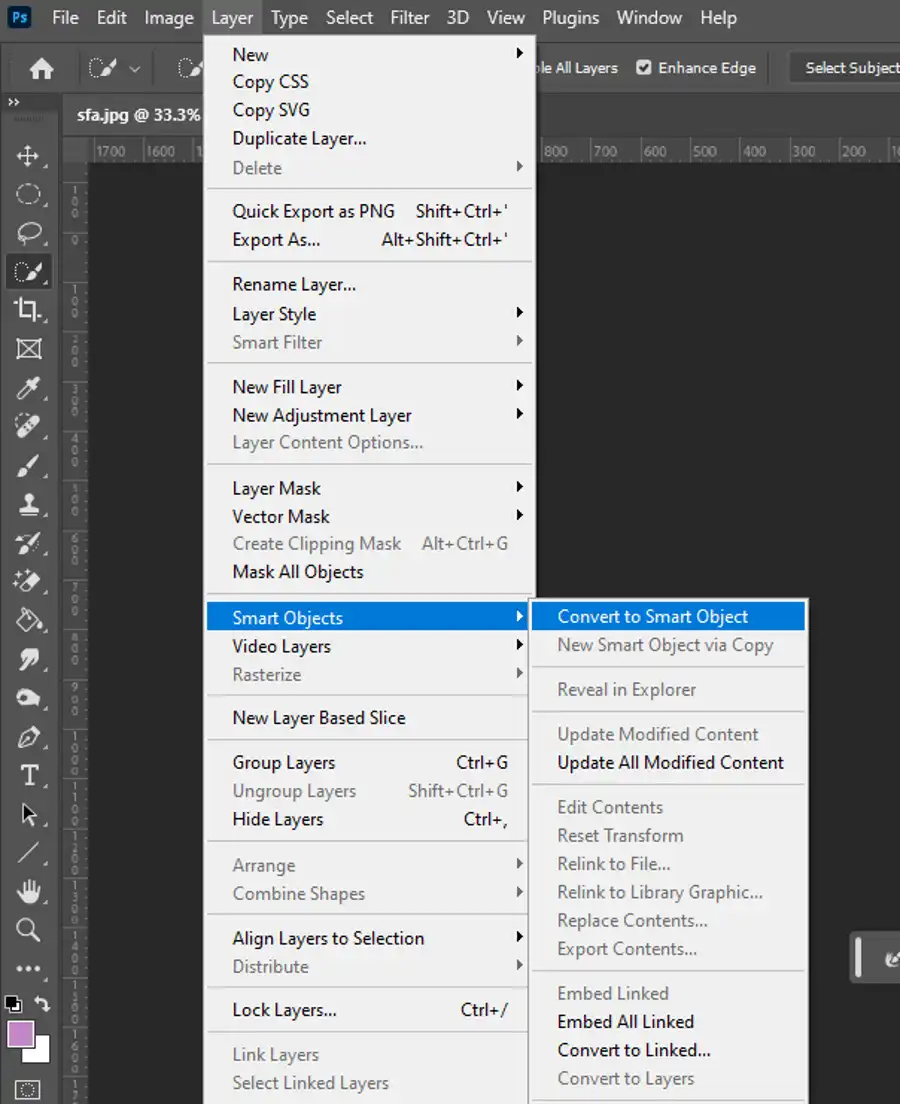
- Right-click the Smart Object Layer and select “Rasterize Layer”.
- Alternatively, you can go to Layer > Rasterize > Smart Object.
Rasterize in Photoshop: What it is and When to Use it
Rasterizing in Photoshop is a technique used to convert vector-based images to pixel-based images. This means that the clean lines of the vector become pixelated. The main purpose of rasterizing a layer is to be able to apply pixel-based effects such as brush adjustments on your vector designs or texts. Here’s more on what rasterizing is and when to use it:
What is the Purpose of Rasterizing a Layer?
As vector layers are made up of geometric formulas to create the contents of an image, they can't be used for pixel effects such as brush adjustments. By rasterizing, you can apply pixel-type effects onto your layer without any issues. With rasterizing, Photoshop changes the look of edges of text, layers, or shapes and you won't be able to rescale without a loss in image quality.
How Do You Rasterize a Layer?
Rasterizing of a layer in Photoshop can be done in two ways: 1) right-clicking on the layer, choose “Rasterize” or 2) going up to Layer > Rasterize and selecting the type of layer(s) you want to rasterize.
When Should You Rasterize A Layer In Photoshop?
The only real reason you’d want to flatten or rasterize a layer in Photoshop is to be able to use certain tools that don’t work with layers or vector-based images. Tools like the brush tool, the clone tool, or the paint bucket tool are all examples of when rasterizing is a useful technique.
Does Rasterizing Reduce Quality?
Rasterizing does impact the quality of the image/layer. Rasterizing the layers changes the look of edges of text, layers, or shapes. Because of this, it’s important to create a duplicate layer if you think you may need to go back and edit your design later.
Why does Photoshop say you need to rasterize a layer?
Photoshop automatically asks you to rasterize a layer when you attempt to use any tool that cannot function in vector or Smart Object layers. For example, if you want to use the brush tool, you would need to rasterize the layer first.
What Kinds of Layers Can be Rasterized?
Not every layer can be rasterized. Only certain layers such as Shapes, Text, and Smart Objects are the layers that can be rasterized.
Questions you might be asking
How do I rasterize a Smart Object layer in Photoshop?
To rasterize a Smart Object layer in Photoshop, you need to right-click on the layer and select "Rasterize Layer" from the drop-down menu. Alternatively, you can go to the "Layer" menu at the top of the screen and select "Rasterize" and then "Smart Object."
What does it mean to rasterize a Smart Object in Photoshop?
Rasterizing a Smart Object in Photoshop converts it from a vector graphic into a regular bitmap image. Essentially, it removes the editable vector information and "flattens" the image so that it can be edited like any other layer in Photoshop.
How do you rasterize an object in Photoshop?
To rasterize a regular object in Photoshop, you need to select the layer and then go to the "Layer" menu at the top of the screen. From there, select "Rasterize" and then choose the appropriate option based on the type of layer you want to rasterize.
How to rasterize Smart Object photopea?
In Photopea, you can rasterize a Smart Object by double-clicking on the Smart Object layer in the Layers panel. This will open the Smart Object in a new tab. From there, you can right-click on the image and select "Rasterize" from the options. Once rasterized, you can edit the layer like any other bitmap image.